---
title: 🎟️ How to Set Up and Manage Your Ticket Page
description: Set up your ticket page, manage purchases, organize guests, and assign table seating all in ClickBid. Everything you need from registration to check-in.
---
[Skip to content](https://support.cbo.io/ticket-page-set-up#main-content)

- [Blog](https://blog.cbo.io/)
- [ClickBid Admin](https://cbo.io/admin/login.php)
Open main navigation
Close main navigation
- [Blog](https://blog.cbo.io/)
- [ClickBid Admin](https://cbo.io/admin/login.php)
- [View our Training Videos](https://training.clickbidonline.com/all-courses/)
[View our Training Videos](https://training.clickbidonline.com/all-courses/)
Welcome to ClickBid's Knowledge Base
- There are no suggestions because the search field is empty.
1. [ClickBid How To Articles](https://support.cbo.io/?hsLang=en)
2. [Tickets & Sponsorships](https://support.cbo.io/tickets-sponsorships?hsLang=en)
3. [Tickets, Sponsorships & Underwriting Overview](https://support.cbo.io/tickets-sponsorships?hsLang=en#tickets-sponsorships-underwriting-overview)
# 🎟️ How to Set Up and Manage Your Ticket Page
ClickBid's Event Tickets section is where you build, configure, and manage everything related to your event's ticket page, from general settings and payment types to selling tickets, sponsor levels, and add-ons. This article covers every section of the ticket page from start to finish.
#### 🗂️ Navigating Your Ticket Pages
If your event has only one ticket page, you will see all ticket page options listed directly in the **Event Tickets** menu in the left-hand navigation.
If your event has multiple ticket pages, each ticket page will appear as its own expandable menu item under **Event Tickets**. Click on a ticket page name to expand its submenu. At the top level you will also see **View All Ticket Sales** and **Manage All Guests** which pull data across all ticket pages at once.
💡Need an additional ticket page? Click **Add More Ticket Pages** in the Event Tickets menu to create one.
---
#### 🪑 Table Seating
Go to **Event Tickets \> Table Seating** to build a visual seating chart and assign guests to tables for your event.
ℹ️ Table Seating is only available on Full Suite plans. It is not available on the Essentials plan.
##### Activating Table Seating
Table Seating must be activated before you can start building your seating chart. Click **Activate Seating Chart** and choose one of two starting options:
**Start Fresh:** clears any existing table name data and opens a blank canvas for you to build your seating chart from scratch.
**Import Existing Assignments**: automatically creates tables from any table name data already on your guest records and preserves those assignments. Use this option if you have already assigned table names to guests in Manage Guests.
Once activated, you can start adding tables and assigning guests.
##### Building Your Seating Chart
The main seating area is your canvas where tables are displayed. The right sidebar shows your guest list.
**Adding a Table**
1. Click **Add Table** on the canvas.
2. Enter the **Table Name** and **Capacity**.
3. Choose the **Table Shape** (round or rectangular).
4. The table will appear on the canvas.
**Assigning Guests to Tables**
1. Find the guest in the right sidebar. By default, only unassigned guests are shown. Toggle **All** to show all guests including those already assigned to a table.
2. Drag the guest card from the sidebar onto a table on the canvas, or click a guest card and select a destination table from the **Move Guest** modal.
**Editing a Table**
Click on any table on the canvas to edit its name, capacity, or shape, move guests between tables, or delete the table.
**Viewing Seating Stats**
Click **Seating Stats** to see a quick summary including total guests, unassigned guests, and total tables.
**Uploading a Floor Plan**
Click **Upload Floor Plan** to upload a background image of your venue floor plan. This displays behind your tables on the canvas to help you position them accurately.
**Printing Your Seating Chart**
Click **Print** to print your seating chart directly from the canvas.
##### Deactivating Table Seating
Click **Deactivate Table Seating** and choose one of two options:
**Retain Assignments**: writes table name data back to each guest record so assignments are preserved. You can reactivate later and import these assignments.
**Reset All**: clears all floor plan and table name data from guest records. Use this only if you want to start completely over.
ℹ️ For a more in-depth guide, including videos on table seating, check out [**Manage Guest Seating with Table Seating Chart**.](https://support.cbo.io/table-seating?hsLang=en)
---
#### 📊 View Ticket Sales
Go to **Event Tickets \> View Ticket Sales** to see all ticket purchases for your event and manage individual orders.
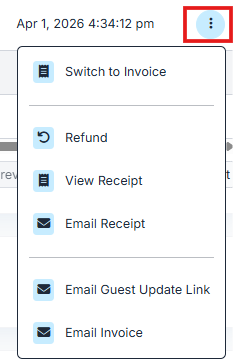
Each row in the table represents one ticket purchase. For each order you can go to the far right click on the 3 dots:
- **Switch to Invoice**: converts a cash or check order to an invoice
- For this option to display the setting for "Send Invoice" must be set to Yes under Ticket Page Settings\>Payment Types.
- **Refund**: issues a refund on a credit card order
- **View Receipt**: opens a printable version of the receipt
- **Email Receipt:** resends the purchase receipt to the buyer
- **Email Guest Update Link**: resends the guest update link so the purchaser can fill in or update guest details
- **Email Invoice**: resends the invoice to the purchase for payment reminder.
- For this option to display the setting for "Send Invoice" must be set to Yes under Ticket Page Settings\>Payment Types.
To expand the purchase click the pencil icon to view the full order details including purchaser name, address, phone, email, total, payment type, purchase date, receipt number, and the guest list for that order. Guest details (first name, last name, phone, notes, and selection) can be edited directly from the expanded order view.

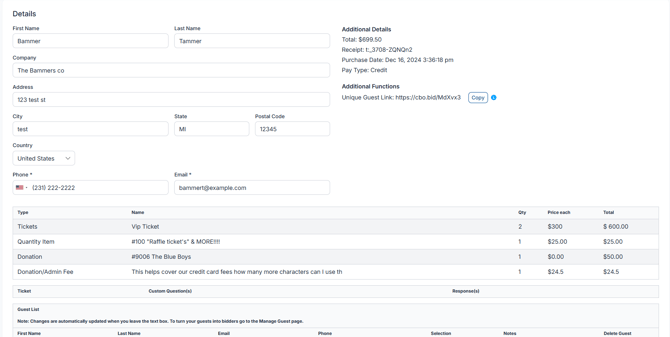
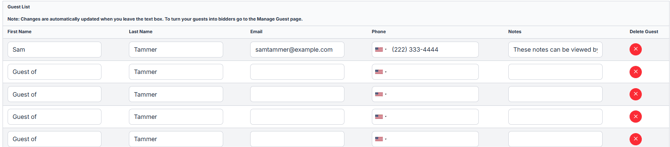
ℹ️ Changes to guest details in the expanded order view save automatically when you leave the text field. A page Refresh will need to be done to view the changes. To convert guests to bidders, use the **Manage Guests** page instead.
##### 📥 Downloading Reports
Two download options are available at the top of the View Ticket Sales page:
**Download Guests**: exports a CSV of all guest records associated with ticket purchases on this ticket page. This includes guest names, phone numbers, email addresses, table assignments, selections, and any custom question responses.
**Download Ticket Sales**: exports a CSV of all ticket purchase orders on this ticket page. This includes purchaser name, ticket type, quantity, payment type, total amount, and purchase date.

💡Use **Download Guests** when you need a list of who is attending. Use **Download Ticket Sales** when you need a financial breakdown of orders for reporting or reconciliation purposes.
#### 🎟️ **Step-by-Step: Refunding a Ticket Purchase**
1. **Click** **Event Tickets** from the main dashboard.
2. Select **View All Ticket Sales**.
3. Find the **purchaser** you want to refund.
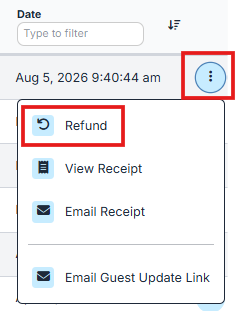
- Click the **3 dots to the far right** next to their name.
4. Click the **refund arrow** to open the **Refund Page**.
#### 💰 **Choose How You Want to Refund**
Once you're on the Refund Page, you have a few options:
- ✅ **Refund by Ticket**
Use the **ticket section** to select and refund individual tickets.
- 💵 **Refund a Specific Dollar Amount**
Click the **custom refund field** to enter an exact dollar value.
- 🧾 **Refund the Entire Line Item**
Use this option if you'd like to refund the whole transaction at once.
💡 **Tip:** Refunds will automatically update the purchaser's receipt and remove tickets from the system.
Once you've selected your refund type:
8\. Click **Submit** to finalize the refund.
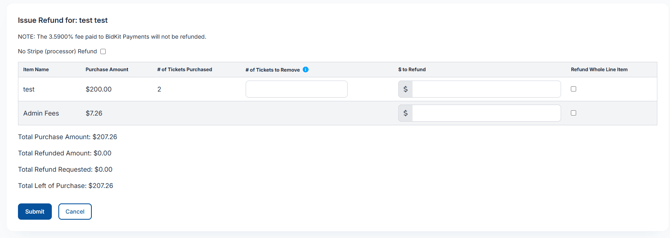
⚠️Please note that the 3.5% credit card processing fee charged by Stripe is non refundable. If you choose to refund this fee to a donor, that amount will come out of your organizations funds.
#### 📧 **Resend a Receipt After Refunding**
If you’d like to send an updated purchase receipt:
1. Click the **3 dots to the far right** next to the date column.
2. Click the **envelope icon** 📩. This sends a new receipt to the purchaser’s email on file.
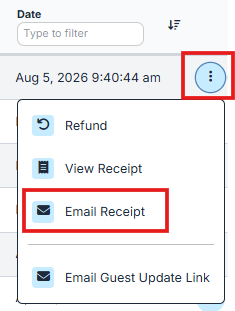
ℹ️ Info: Resending a receipt is a great way to reassure donors their refund was successful.
---
#### 👤 **Deleting Bidders After a Refund**
If your guests were **converted to bidders** during ticketing, their records will still exist under:
- **Bidders** \> **Manage Bidders**
To fully remove these records:
1. Locate the **converted guests**.
2. Select their **bidder profile**.
3. Scroll to **Batch Update**.
4. Toggle **Delete** and **type "delete" to confirm**.
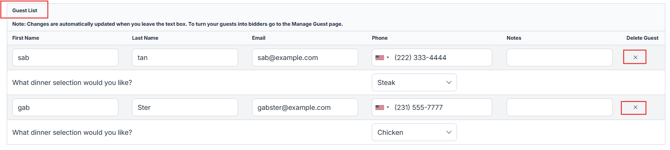
**❗Important:** After refunding the ticket purchase and removing the bidder, don’t forget to go to **View Ticket Sales** \> **Edit the Ticket Purchase**. Scroll down to the **Guest List** section and delete any associated guests.
This step ensures your reports remain accurate and up to date. Leaving guests on the list will cause report totals to be incorrect.
#### 🚫 **Can’t Process a Refund?**
Here are common reasons why a refund might not work:
- **Transaction is still pending.**
Check the **merchant page**:
- If the status is **"SUBMITTED FOR SETTLEMENT"**, the refund can’t be processed yet.
- Wait for the status to change to **"Settled"**, usually within 24 hours.
- **Account has already been paid out.**
If your account has received a payout for that transaction, refunds must be handled offline or manually noted.
💡 **Tip:** Always verify transaction status before attempting a refund to avoid delays.
##### Removing a Ticket Sale
To delete one or more ticket purchases:
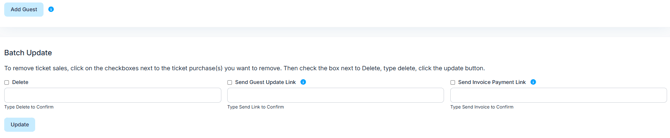
1. Before removing any ticket purchase, make sure the **purchase and ticket are refunded first**. Removing them without completing the refund process could cause your reports to be inaccurate.
2. Check the boxes next to the orders you want to remove.
3. Scroll down to the **Batch Update** section.
4. Check the box next to **Delete**.
5. Type **delete** in the confirmation field.
6. Click **Update**.
⚠️ Deleting a ticket sale is permanent and cannot be undone. This removes the purchase record entirely and does not issue a refund. If a refund is needed, process the refund first before deleting.
##### Sending Batch Emails
To send the guest update link or invoice payment link to multiple purchasers at once:
1. Check the boxes next to the orders you want to contact.
2. In the **Batch Update** section, check **Send Guest Update Link** or **Send Invoice Payment Link**.
3. Click **Update**.
If your event has multiple ticket pages, use **View All Ticket Sales** at the top of the Event Tickets menu to see a combined report across all pages.
---
#### 👥 Manage Guests
Go to **Event Tickets \> Manage Guests** to view and manage all individual guest records associated with ticket purchases.
Each row in the table represents one guest. From this page you can search and filter guests, edit individual guest records, and perform bulk actions across multiple guests at once.
##### 📥 Downloading the Guest Report
Click **Download Manage Guest Report** at the top of the Manage Guests page to export a CSV of all guest records across this ticket page. This report includes purchaser information, guest names, phone numbers, email addresses, table assignments, ticket types, selections, custom question responses, and bidder conversion status.
💡This report is useful for cross-referencing your guest list against your bidder list, verifying table assignments, or sharing attendee information with your event team ahead of the night of the event.
##### 📧 Sending the Guest Update Link
The Guest Update Link allows purchasers to fill in or update the details for their guests after completing their ticket purchase. The link is sent directly to the purchaser, not the individual guests. The purchaser can either fill in the guest details themselves or forward the link to their guests to complete.
1. Check the boxes next to the purchasers you want to send the link to.
2. Click the **Email Guest Update Link** button at the top of the page.
3. The email will be sent directly to each selected purchaser.
ℹ️ The Guest Update Link email goes to the ticket purchaser only. It is the purchaser's responsibility to either complete the guest details themselves or share the link with their guests to fill out.
##### Batch Update Options
To update multiple guests at once:
1. Check the boxes next to the guests you want to update.
2. In the **Batch Update** section, check the box next to the field you want to update and enter the new value.
3. Click **Update**.
Available batch update fields:
**Purchaser Company Name:** updates the company name on the selected guest records.
**Table Name**: assigns or updates the table name for the selected guests. Use this to manage table assignments when Table Seating is not activated.
**Make Bidder**: converts the selected guests into bidder records so they can log in to the auction site. Type **Make Bidder** in the confirmation field to confirm.

ℹ️ You can only convert up to 100 guests to bidders at a time. If you have more than 100 guests to convert, repeat the process in groups of 100. Once converted, bidders will appear in your **Manage Bidders** page.
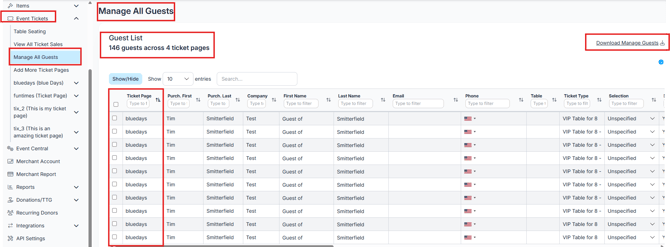
If your event has multiple ticket pages, use **Manage All Guests** at the top of the Event Tickets menu to view and manage guests across all ticket pages at once. This is useful when you want to batch convert guests to bidders, assign table names, or download a guest report without having to switch between individual ticket pages. The same batch update options and download report are available from Manage All Guests as they are on each individual ticket page's Manage Guests page.
---
#### 📈 Sales Summary
Go to **Event Tickets \> Sales Summary** for a quick snapshot of your ticket page revenue broken down by ticket type.
The summary includes the following sections:
**Overall Totals**: shows total ticket sales, total sponsorship sales, total underwriting sales, total quantity item sales, total discounts applied, and the overall grand total.
**Individual Ticket Breakdown**: shows each ticket type with total guests, quantity sold, and total sales for that ticket type.
**Sponsor Level Breakdown**: shows each sponsor level with tickets sold and total sales.
**Underwriting Breakdown**: shows each underwriting option with total sales.
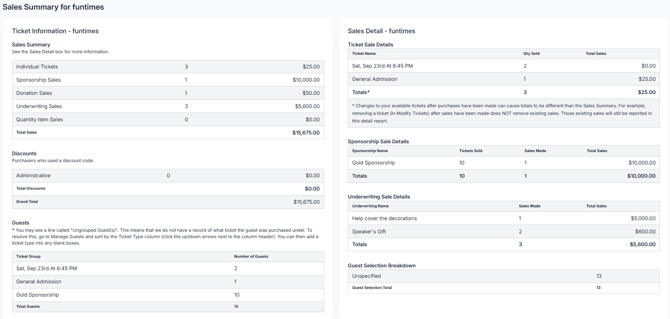
ℹ️ Changes to your available tickets after purchases have been made can cause totals to appear different than expected. For example, removing a ticket type in Modify Tickets after sales have been made does not remove existing sales, those sales will still be counted in the Sales Summary.
**Guests**: shows a breakdown of the total number of guests grouped by ticket type. Each row displays the ticket group name and the number of guests associated with it, with a total guest count at the bottom.
ℹ️ You may see a line called "Ungrouped Guest(s)" in this section. This means ClickBid does not have a record of which ticket type that guest was purchased under. To resolve this, go to **Manage Guests** and sort by the **Ticket Type** column using the up and down arrows next to the column header. You can then add a ticket type to any blank boxes.
**Guest Information**: shows a searchable table of guests grouped by table name with the number of guests assigned to each table. Use the **Search** field to find a specific table, or use the **Show** dropdown to control how many entries display at a time. You can sort by table name or number of guests by clicking the column headers.
G**uest Selection Breakdown**: shows a summary of how many guests selected each meal or event selection option. Each row displays the selection name and the number of guests who chose it, with a Guest Selection Total at the bottom. Guests who did not make a selection are listed as **Unspecified**.
💡Use the Guest Selection Breakdown to plan catering quantities ahead of your event. Share this report with your venue or caterer so they know exactly how many of each meal option to prepare.
---
#### ⚙️ Ticket Page Settings
Go to **Event Tickets \> Ticket Page Settings** to configure how your ticket page looks, what information it collects, and how it behaves. All settings save automatically when you make a change.
##### 🔗 Your Ticket Page Link and QR Code
At the top of the Ticket Page Settings page you will find your ticket page URL. Use this link for buttons, emails, or any place you want to direct supporters to purchase tickets.
⚠️ Always use the ticket page URL found on this settings page when sharing your ticket page link. Do not click the link to open the ticket page and then copy the URL from the top of your browser, the URL may change once the page loads and could cause issues with your ticket purchases.
Click **Click to load your Ticket Page QR Code** to generate a scannable QR code linking directly to your ticket page.
**Embeddable Ticket Form**: click **Copy Embed Code** to get a JavaScript snippet you can paste into your website to embed the ticket form directly on your own page. The snippet handles sizing and formatting automatically so the form displays correctly for your visitors.
ℹ️ Adding the embed code to your website requires access to your website's HTML or code editor. The process varies depending on which platform your website is built on. Most website platforms such as WordPress, Squarespace, Wix, and Webflow have a built-in option to add custom code or HTML to a page, look for a custom code block, HTML widget, or embed element in your page editor and paste the code there. If you are not sure how to add custom code to your website, we recommend reaching out to your website administrator or checking your website platform's support documentation.
---
##### 🏷️ General Settings
**Ticket Page Name**: the short internal name for this ticket page used in your admin navigation and in the URL. Maximum 20 characters, no spaces.
**Request Company Name of Purchaser:** set to Yes to add a company name field to the purchase form. Useful for corporate sponsors or group purchasers.
**Allow Guest Updates**: if set to Yes, a separate email with a Guest Update link will be sent to ticket purchasers after they complete their purchase so they can fill in or update guest details later. If set to No, the Guest Update link will not be sent and the Guest Update page will not allow edits.
**Allow Purchaser to keep card on file**: if set to Yes, ticket purchasers will have the option to save a card on file for the event during checkout and be created as a bidder.
💡 Allowing card on file on the ticket page is a great way to collect payment information before the event so check-in and checkout go faster on the night of.
**Include Landing Page Navigation Bar on Ticket Page**: set to Yes to display your event's navigation menu at the top of the ticket page. This is a great option if you want to direct your ticket purchase to your landing page to view more event information after the ticket purchase is complete.
**Show Fair Market Value on Ticket Purchaser Receipts**: set to Yes to display the fair market value of tickets on emailed receipts.
**Ticket Page Guest Limit**: enter a number to cap the total number of guests that can be purchased across all ticket types on this ticket page. Leave blank for no limit.
**Closing Date**: sets the date and time when ticket purchases will stop being accepted on this ticket page. Leave blank to keep the page open indefinitely. If you need to close the page immediately, set the closing date to a time in the past.
ℹ️ Closing dates and times are based on the time zone set for your event. You can confirm or update your event time zone under your Auction Settings\> General Event Details.
**Receipt Email Addresses**: select which email addresses should receive a notification when a ticket purchase is made. If none are selected, receipts will be sent to the address under **Event Settings \> Event Support Contact**.
---
##### 📐 Section Order
Drag and drop the sections to control the order they appear on your ticket purchase page. Available sections are Tickets & Tickets Guests, Sponsorships & Sponsorships Guests, Underwriting, Donation, and Quantity Items.
ℹ️ Guest detail sections always follow directly after their related ticket or sponsorship section and move together when you reorder.
---
##### 📍 Venue Information
Enter your event's address here. This is used to display a location and map link on your ticket page.
---
##### 💳 Payment Types
Choose which payment methods guests can use to purchase tickets.
**Accept Credit Card Payment**: allows guests to pay by credit card at checkout. Recommended for most events.
**Cash**: allows guests to select Cash as their payment method.
**Send Invoice**: allows guests to select Invoice as their payment method. An invoice email will be sent to the purchaser.
**Check:** allows guests to select Check as their payment method.
**Check Payable To**: if Check is enabled, enter the name checks should be made payable to. This displays to the guest during checkout.
ℹ️ Want to give purchasers the option to **opt in or out of covering the admin fee**? You can manage this setting under **Software Settings \> Auction Settings \> Payment \> Capture Admin Fees**.
For more information about how admin fees work, see [Adding Admin Fees to Checkouts](https://chatgpt.com/adding-credit-card-fees-to-checkouts-1).
##### ✨ Additional Features
**Show QR Code on Receipt**: if set to Yes, a QR code is included under the **Order Information** of ticket purchase receipts. This code can be scanned in Butler to speed up check-in.
**Show Logo on Ticket Page**: if set to Yes, your event logo appears on the ticket page, invoice, and order confirmation page. Click **Add/edit your logo here** to update your logo under Software Settings\>Event Settings.
**Section Title and Icon Customization**: customize the display name and icon for each section of your ticket page. Available sections include Ticket Title, Sponsor Title, Ticket Guest Details Title, Sponsorship Guest Details Title, Underwriting Title, Quantity Items Title, Donation Title, and Payment Title.
To customize a section title:
1. Locate the section you want to update.
2. Click the **icon button** to the left of the section name to open the icon picker and choose a different icon.
3. Click into the **text field** next to the icon and type your custom section name.
4. Changes save automatically when you leave the field.
ℹ️ Section titles have a maximum of 45 characters. If a field is left blank the default ClickBid section name will be used. *Section icons display on desktop screens only.*
**Quantity Items**: select one or more quantity-type auction items to display as add-on purchases on your ticket page. Use Ctrl-click to select multiple items.

**Donation Items**: select one or more donation items to display on your ticket page so guests can add a donation at the time of purchase.

---
**Customizable Content**: add a custom header, body text, and additional messaging that displays on your ticket page and in emails sent to purchasers. This is a great place to add event details, a welcome message, or any information you want guests to see before they purchase.
**Header**: type the title you want to display at the top of the content block on your ticket page.
**Text Body**: type your custom message below the header. The text editor supports bold, italic, underline, font size, font color, alignment, numbered lists, bullet lists, links, and text formatting. Maximum 3000 characters.
💡 Use the Header and Text Body to share event details like the date, time, location, dress code, or parking instructions so guests have everything they need right on the ticket page.
**Receipt Header**: add custom content that will appear at the top of the receipt email sent to purchasers after they complete their purchase. This field supports full rich text formatting including images and links.
**Guest Update Link Email Message**: customize the email sent to purchasers with a link to update their guest information. If left blank the default message will be used: "Thank you for purchasing tickets to our event! You may use this link below to update guest information for your guests. You may also forward this link to your guests to have them update their info. Guest phone and email are being requested to provide mobile bidding text alerts and to email receipts for purchases at the event."
**Invoice Email Message**: customize the message included in the invoice email sent to purchasers who selected Invoice as their payment method. If left blank the default message will be used: "Please take a moment to review and submit payment. If you have any questions, please feel free to contact us."
**Invoice Additional Information**: add any extra details you want included in the Payment Details section of the invoice, such as mailing instructions, payment deadlines, or check payable information.
**Header Image**: upload a banner image that displays at the top of your ticket page.
1. Drag and drop your image into the upload area, or click to browse and select a file.
2. The image will appear at the top of your ticket page once uploaded.
ℹ️ For best results, use an image sized at 1272 x 544 pixels. Maximum file size is 8MB.
---
#### 🎫 Modify Tickets
Go to **Event Tickets \> Modify Tickets** to create and manage the individual tickets, sponsor levels, underwriting options, and selections available for purchase on your ticket page.
The page is organized into four tables: **Individual Tickets**, **Sponsor Levels**, **Underwriting**, and **Selections**. Each section has its own **Add** button to create new entries and an **edit icon** to open and update existing ones.
ℹ️ When adding a new ticket, sponsor level, or underwriting option, the record saves for the first time after the Name and Price fields are both filled in.
##### 🎟️ Individual Tickets
Individual tickets are standard single-entry ticket types for your event.
**To add a new individual ticket:**
1. Click **Add Ticket**.
2. Fill in the following fields. The record saves automatically after **Ticket Name** and **Price** are entered.
| Field | Description |
| --- | --- |
| Ticket Name | The name of the ticket as it appears on the ticket page. Must be unique. |
| Price | The purchase price of the ticket. |
| Fair Market Value | The fair market value for receipt purposes. |
| Guests per Ticket | How many guest detail records are collected per ticket purchased. |
| Max Tickets per Order | The maximum number of this ticket type a single purchaser can buy in one order. |
| Quantity Available | Total number available. Enter 0 for no limit. |
| Hide Qty Available | Set to Yes to hide the remaining quantity from guests. |
| Mark as Sold Out | Set to Yes to mark the ticket as sold out. It still displays but cannot be purchased. Will have a sold out tag on the ticket page. |
| Visible | Set to Yes to show on the ticket on the page. Set to No to hide it. |
| Ticket Details | A text area for describing what is included with the ticket. |
##### 💰 Discount Codes and Complimentary Tickets
Discount codes can be added to both individual tickets and sponsor levels.
**For a discounted price:** click **+ Discount Code**, enter your code (for example: STAFF or VIP), and enter the final price the guest will pay in the **Discount Price** field.
**For a complimentary ticket**: click **+ Discount Code**, enter your code, and enter **0** in the **Discount Price** field.
You can add multiple discount codes to the same ticket by clicking **+ Discount Code** again. To remove a code, click the red **delete icon** next to it.
⚠️ The Discount Price field is the final amount the guest pays, not the amount taken off. Always enter what you want the guest to be charged. Double-check before sharing any codes.
##### ❓ Custom Questions
Custom Questions can be added to individual tickets to collect additional information from purchasers or their guests at checkout.
**To add a custom question:**
1. Click **Add Question**.
2. Set whether the question is **Active**.
3. Choose the **Response Type**: **Text** for a free-form answer, or **Drop Down** for a list of preset options.
4. If you choose **Drop Down**, click **Add Option** to add each choice.
5. Set **Show On** to either **Ticket** (the purchaser answers once per order) or **Guest Record** (each guest answers individually).
6. Set **Is Answer Required** to Yes or No.
Custom questions can be reordered by dragging the grip handle at the start of each question row.
ℹ️ If you plan to use Bidder Tags as options in a Drop Down custom question, set up your tags first before creating the question. Go to **Bidders \> Manage Bidders**, scroll down to the **Bidder Tags** area, and add all of your tags there before coming back to add your custom question options here.
---
##### 🏅 Sponsor Levels
Sponsor levels are ticket types for corporate sponsors or group purchasers who receive multiple tickets per purchase.
**To add a new sponsor level:**
1. Click **Add Sponsor Level**.
2. Fill in the following fields. The record saves automatically after **Sponsor Level** and **Price** are entered.
| Field | Description |
| --- | --- |
| Sponsor Level | The name of the sponsorship. Must be unique. |
| Price | The purchase price. |
| Fair Market Value | The fair market value for receipt purposes. |
| Tickets per Purchase | How many tickets are included with this sponsorship. |
| Quantity Available | Total available. Enter 0 for no limit. |
| Hide Qty Available | Set to Yes to hide the remaining quantity from guests. |
| Sold Out | Set to Yes to mark as sold out. |
| Visible | Set to Yes to show on the ticket page. Set to No to hide it. |
| Sponsorship Details | A text area for describing what is included with the sponsorship. |
##### 💰 Discount Codes and Complimentary Tickets
Discount codes can be added to both individual tickets and sponsor levels.
**For a discounted price**: click **+ Discount Code**, enter your code (for example: STAFF or VIP), and enter the final price the guest will pay in the **Discount Price** field.
**For a complimentary ticket**: click **+ Discount Code**, enter your code, and enter **0** in the **Discount Price** field.
You can add multiple discount codes to the same ticket by clicking **+ Discount Code** again. To remove a code, click the red **delete icon** next to it.
⚠️ The Discount Price field is the final amount the guest pays, not the amount taken off. Always enter what you want the guest to be charged. Double-check before sharing any codes.
##### ❓ Custom Questions
Custom Questions can be added to individual tickets to collect additional information from purchasers or their guests at checkout.
**To add a custom question:**
1. Click **Add Question**.
2. Set whether the question is **Active**.
3. Choose the **Response Type**: **Text** for a free-form answer, or **Drop Down** for a list of preset options.
4. If you choose **Drop Down**, click **Add Option** to add each choice.
5. Set **Show On** to either **Ticket** (the purchaser answers once per order) or **Guest Record** (each guest answers individually).
6. Set **Is Answer Required** to Yes or No.
Custom questions can be reordered by dragging the grip handle at the start of each question row.
ℹ️ If you plan to use Bidder Tags as options in a Drop Down custom question, set up your tags first before creating the question. Go to **Bidders \> Manage Bidders**, scroll down to the **Bidder Tags** area, and add all of your tags there before coming back to add your custom question options here.
---
##### 🎁 Underwriting
Underwriting options are add-on purchases that appear alongside tickets during checkout. Commonly used for raffle tickets, recognition opportunities, or other purchasable extras.
**To add a new underwriting option:**
1. Click **Add Underwriting**.
2. Fill in the following fields. The record saves automatically after **Underwriting Name** and **Price** are entered.
| Field | Description |
| --- | --- |
| Underwriting Name | The name of the underwriting option. Must be unique. |
| Price | The purchase price. |
| Fair Market Value | The fair market value for receipt purposes. |
| Quantity Available | Total available. Enter 0 for no limit. |
| Hide Qty Available | Set to Yes to hide the remaining quantity from guests. |
| Sold Out | Set to Yes to mark as sold out. |
| Visible | Set to Yes to show on the ticket page. Set to No to hide it. |
| Underwriting Details | A text area for describing the underwriting option. |
💡 To view underwriting sales, go to **View Ticket Sales**, toggle **Show All**, and click the arrow next to **Underwriting**. Click **CSV** to download. You can also find a summary of underwriting sales totals on the **Sales Summary** page.
##### ❓ Custom Questions
Custom Questions can be added to individual tickets to collect additional information from purchasers or their guests at checkout.
**To add a custom question:**
1. Click **Add Question**.
2. Set whether the question is **Active**.
3. Choose the **Response Type**: **Text** for a free-form answer, or **Drop Down** for a list of preset options.
4. If you choose **Drop Down**, click **Add Option** to add each choice.
5. Set **Show On** to either **Ticket** (the purchaser answers once per order) or **Guest Record** (each guest answers individually).
6. Set **Is Answer Required** to Yes or No.
Custom questions can be reordered by dragging the grip handle at the start of each question row.
ℹ️If you plan to use Bidder Tags as options in a Drop Down custom question, set up your tags first before creating the question. Go to **Bidders \> Manage Bidders**, scroll down to the **Bidder Tags** area, and add all of your tags there before coming back to add your custom question options here.
---
##### 📋 Selections
Selections are predefined options that purchasers choose from during checkout, such as a meal choice or t-shirt size.
**To add a new selection:**
1. Click **Add Selection**.
2. Fill in the following fields. The record saves automatically after **Selection** is populated.
| Field | Description |
| --- | --- |
| Selection | The name of the option the purchaser will choose from (e.g. Chicken, Vegetarian). |
| Show On | Choose whether this applies to All ticket types or a specific individual ticket or sponsor level. |
| Description | An optional description of the selection. |
---
#### 📝 Enter RSVP Ticket
Click **Event Tickets \> Enter RSVP Ticket** to open your ticket page in RSVP mode. This allows staff or administrators to enter complimentary or RSVP tickets on behalf of guests without going through the standard purchase flow.
---
#### ➕ Add More Ticket Pages
Click **Event Tickets \> Add More Ticket Pages** to create an additional ticket page for your event. Each ticket page has its own settings, ticket types, and guest list. Multiple ticket pages are useful when you want to offer different ticket experiences, for example, a general admission page and a VIP page or a Golf Outing and a 5K run
- [Account & Setup](https://support.cbo.io/account-setup?hsLang=en#main-content)
- [Users & Logging In](https://support.cbo.io/account-setup?hsLang=en#users-logging-in)
- [Billing/Renewal](https://support.cbo.io/account-setup?hsLang=en#billing-renewal)
- [Organization Account](https://support.cbo.io/account-setup?hsLang=en#organization-account)
- [Event Settings](https://support.cbo.io/account-setup?hsLang=en#event-settings)
- [Auction Settings](https://support.cbo.io/account-setup?hsLang=en#auction-settings)
- [Welcome Page](https://support.cbo.io/account-setup?hsLang=en#welcome-page)
- [Get Started](https://support.cbo.io/get-started?hsLang=en#main-content)
- [Pre-Event Prep](https://support.cbo.io/get-started?hsLang=en#pre-event-prep)
- [Creating a New Event](https://support.cbo.io/get-started?hsLang=en#creating-a-new-event)
- [Event Day Toolkit](https://support.cbo.io/event-day-toolkit?hsLang=en#main-content)
- [Paddle Raise](https://support.cbo.io/event-day-toolkit?hsLang=en#paddle-raise)
- [Live Auction](https://support.cbo.io/event-day-toolkit?hsLang=en#live-auction)
- [Silent Auction](https://support.cbo.io/event-day-toolkit?hsLang=en#silent-auction)
- [Butler](https://support.cbo.io/event-day-toolkit?hsLang=en#butler)
- [Volunteer Training](https://support.cbo.io/event-day-toolkit?hsLang=en#volunteer-training)
- [Messaging](https://support.cbo.io/messaging?hsLang=en#main-content)
- [Text & Emails](https://support.cbo.io/messaging?hsLang=en#text-emails)
- [Chat Bidders](https://support.cbo.io/messaging?hsLang=en#chat-bidders)
- [Welcome Text, Text Bidders, & Email Bidders](https://support.cbo.io/messaging?hsLang=en#welcome-text-text-bidders-email-bidders)
- [Tickets & Sponsorships](https://support.cbo.io/tickets-sponsorships?hsLang=en#main-content)
- [Tickets, Sponsorships & Underwriting Overview](https://support.cbo.io/tickets-sponsorships?hsLang=en#tickets-sponsorships-underwriting-overview)
- [Reporting & Data](https://support.cbo.io/tickets-sponsorships?hsLang=en#reporting-data)
- [Manage Ticketed Guests](https://support.cbo.io/tickets-sponsorships?hsLang=en#manage-ticketed-guests)
- [RSVP & Invoicing](https://support.cbo.io/tickets-sponsorships?hsLang=en#rsvp-invoicing)
- [Items](https://support.cbo.io/items?hsLang=en#main-content)
- [Items Overview & Setup](https://support.cbo.io/items?hsLang=en#items-overview-setup)
- [Quantity Items / E-Commerce](https://support.cbo.io/items?hsLang=en#quantity-items-e-commerce)
- [Item Donation Form and Donors](https://support.cbo.io/items?hsLang=en#item-donation-form-and-donors)
- [FMV & Tax](https://support.cbo.io/items?hsLang=en#fmv-tax)
- [Peer to Peer and Donation Campaigns](https://support.cbo.io/peer-to-peer-and-donation-campaigns?hsLang=en#main-content)
- [Peer to Peer and Donation Setup](https://support.cbo.io/peer-to-peer-and-donation-campaigns?hsLang=en#peer-to-peer-and-donation-setup)
- [Recurring Donations](https://support.cbo.io/peer-to-peer-and-donation-campaigns?hsLang=en#recurring-donations)
- [Text to Give](https://support.cbo.io/peer-to-peer-and-donation-campaigns?hsLang=en#text-to-give)
- [Embed Your Donation Form](https://support.cbo.io/peer-to-peer-and-donation-campaigns?hsLang=en#embed-your-donation-form)
- [Appeal Display](https://support.cbo.io/peer-to-peer-and-donation-campaigns?hsLang=en#appeal-display)
- [Bidders](https://support.cbo.io/bidders?hsLang=en#main-content)
- [Bidder Setup](https://support.cbo.io/bidders?hsLang=en#bidder-setup)
- [Donor Thank You Letters](https://support.cbo.io/bidders?hsLang=en#donor-thank-you-letters)
- [Bidder Registration Custom Questions](https://support.cbo.io/bidders?hsLang=en#bidder-registration-custom-questions)
- [Reporting & Data](https://support.cbo.io/reporting-data?hsLang=en#main-content)
- [Event Reporting](https://support.cbo.io/reporting-data?hsLang=en#event-reporting)
- [Credit Card Processing & Payments](https://support.cbo.io/credit-card-processing-payments?hsLang=en#main-content)
- [Credit Card Processing & Payments](https://support.cbo.io/credit-card-processing-payments?hsLang=en#credit-card-processing-payments)
- [FAQs](https://support.cbo.io/credit-card-processing-payments?hsLang=en#faqs)
- [Merchant Account & Merchant Report](https://support.cbo.io/credit-card-processing-payments?hsLang=en#merchant-account-merchant-report)
- [Web Content / Event Landing Pages](https://support.cbo.io/web-content-event-landing-pages?hsLang=en#main-content)
- [Design & Customization](https://support.cbo.io/web-content-event-landing-pages?hsLang=en#design-customization)
- [Accepting Donations From Your Landing Page](https://support.cbo.io/web-content-event-landing-pages?hsLang=en#accepting-donations-from-your-landing-page)
- [EventStream Video Streaming](https://support.cbo.io/eventstream-video-streaming?hsLang=en#main-content)
- [Virtual Live Auction and Paddle Raise](https://support.cbo.io/eventstream-video-streaming?hsLang=en#virtual-live-auction-and-paddle-raise)
- [EventStream FAQ](https://support.cbo.io/eventstream-video-streaming?hsLang=en#eventstream-faq)
- [Integrations + Partners](https://support.cbo.io/integrations-partners?hsLang=en#main-content)
- [Neon One](https://support.cbo.io/integrations-partners?hsLang=en#neon-one)
- [Raiser's Edge NXT](https://support.cbo.io/integrations-partners?hsLang=en#raisers-edge-nxt)
- [Bloomerang](https://support.cbo.io/integrations-partners?hsLang=en#bloomerang)
- [Salesforce for Nonprofits](https://support.cbo.io/integrations-partners?hsLang=en#salesforce-for-nonprofits)
- [Charityproud](https://support.cbo.io/integrations-partners?hsLang=en#charityproud)
- [Classy](https://support.cbo.io/integrations-partners?hsLang=en#classy)
- [TravelPledge](https://support.cbo.io/integrations-partners?hsLang=en#travelpledge)
- [Double the Donation](https://support.cbo.io/integrations-partners?hsLang=en#double-the-donation)
- [HGA Fundraising](https://support.cbo.io/integrations-partners?hsLang=en#hga-fundraising)
- [Public API](https://support.cbo.io/integrations-partners?hsLang=en#public-api)
- [Zapier](https://support.cbo.io/integrations-partners?hsLang=en#zapier)
- [Virtuous](https://support.cbo.io/integrations-partners?hsLang=en#virtuous)
- [Charity Experiences](https://support.cbo.io/integrations-partners?hsLang=en#charity-experiences)
- [Donorperfect](https://support.cbo.io/integrations-partners?hsLang=en#donorperfect)
- [Little Green Light](https://support.cbo.io/integrations-partners?hsLang=en#little-green-light)
- [FAQs](https://support.cbo.io/faqs?hsLang=en#main-content)
- [FAQs](https://support.cbo.io/faqs?hsLang=en#faqs)
[](https://try.cbo.io)
ClickBid Training Hub
Copyright © 2026, ClickBid Event Fundraising
```json
{
"@context" : "https://schema.org",
"@type" : "VideoObject",
"caption" : {
"@type" : "MediaObject",
"contentUrl" : "https://support.cbo.io/media-transcripts/220206328670/en.vtt",
"inLanguage" : "en",
"name" : "en Captions"
},
"contentUrl" : "https://22025730.fs1.hubspotusercontent-na1.net/hubfs/22025730/video_assets/220206328670/inherited/web_optimized.mp4",
"dateModified" : "2026-08-24T16:11:08.386Z",
"duration" : "PT8M28S",
"height" : 1080,
"name" : "Managing Ticket Sales - Vid 4",
"thumbnailUrl" : "https://22025730.fs1.hubspotusercontent-na1.net/hubfs/22025730/Managing%20Ticket%20Sales%20-%20Vid%204.mp4/medium.jpg",
"uploadDate" : "2026-08-24T16:10:43.220Z",
"width" : 1920
}
```
```json
{
"@context" : "https://schema.org",
"@type" : "VideoObject",
"caption" : {
"@type" : "MediaObject",
"contentUrl" : "https://support.cbo.io/media-transcripts/220206379810/en.vtt",
"inLanguage" : "en",
"name" : "en Captions"
},
"contentUrl" : "https://22025730.fs1.hubspotusercontent-na1.net/hubfs/22025730/video_assets/220206379810/inherited/web_optimized.mp4",
"dateModified" : "2026-08-24T16:10:30.393Z",
"duration" : "PT3M7S",
"height" : 1080,
"name" : "Refunding a Ticket - Vid 5",
"thumbnailUrl" : "https://22025730.fs1.hubspotusercontent-na1.net/hubfs/22025730/Refunding%20a%20Ticket%20-%20Vid%205.mp4/medium.jpg",
"uploadDate" : "2026-08-24T16:10:15.795Z",
"width" : 1920
}
```
```json
{
"@context" : "https://schema.org",
"@type" : "VideoObject",
"caption" : {
"@type" : "MediaObject",
"contentUrl" : "https://support.cbo.io/media-transcripts/220206484742/en.vtt",
"inLanguage" : "en",
"name" : "en Captions"
},
"contentUrl" : "https://22025730.fs1.hubspotusercontent-na1.net/hubfs/22025730/video_assets/220206484742/inherited/web_optimized.mp4",
"dateModified" : "2026-08-24T16:10:49.764Z",
"duration" : "PT5M25S",
"height" : 1080,
"name" : "Configuring Ticket Page Settings - Vid 1",
"thumbnailUrl" : "https://22025730.fs1.hubspotusercontent-na1.net/hubfs/22025730/Configuring%20Ticket%20Page%20Settings%20-%20Vid%201.mp4/medium.jpg",
"uploadDate" : "2026-08-24T16:10:28.932Z",
"width" : 1920
}
```
```json
{
"@context" : "https://schema.org",
"@type" : "VideoObject",
"caption" : {
"@type" : "MediaObject",
"contentUrl" : "https://support.cbo.io/media-transcripts/220206484644/en.vtt",
"inLanguage" : "en",
"name" : "en Captions"
},
"contentUrl" : "https://22025730.fs1.hubspotusercontent-na1.net/hubfs/22025730/video_assets/220206484644/inherited/web_optimized.mp4",
"dateModified" : "2026-08-24T16:10:36.487Z",
"duration" : "PT3M48S",
"height" : 1080,
"name" : "Ticket Page Customization - Vid 2",
"thumbnailUrl" : "https://22025730.fs1.hubspotusercontent-na1.net/hubfs/22025730/Ticket%20Page%20Customization%20-%20Vid%202.mp4/medium.jpg",
"uploadDate" : "2026-08-24T16:10:20.198Z",
"width" : 1920
}
```
```json
{
"@context" : "https://schema.org",
"@type" : "VideoObject",
"caption" : {
"@type" : "MediaObject",
"contentUrl" : "https://support.cbo.io/media-transcripts/220206379857/en.vtt",
"inLanguage" : "en",
"name" : "en Captions"
},
"contentUrl" : "https://22025730.fs1.hubspotusercontent-na1.net/hubfs/22025730/video_assets/220206379857/inherited/web_optimized.mp4",
"dateModified" : "2026-08-24T16:10:55.950Z",
"duration" : "PT5M26S",
"height" : 1080,
"name" : "How to Builld Your Tickets - Vid 3",
"thumbnailUrl" : "https://22025730.fs1.hubspotusercontent-na1.net/hubfs/22025730/How%20to%20Builld%20Your%20Tickets%20-%20Vid%203.mp4/medium.jpg",
"uploadDate" : "2026-08-24T16:10:31.162Z",
"width" : 1920
}
```