⚙️ Getting Started
- Log in to your ClickBid admin dashboard.
- In the top navigation, click Events.
- On the Events page, click the + Add Event button near the top of the screen.
- The Create New Event modal will open. Click Next to move through each step.

The event creation process has four steps: Event Details, Event Administrator Info, Event Content, and a final Confirmation screen. You can go back and edit any section before saving.
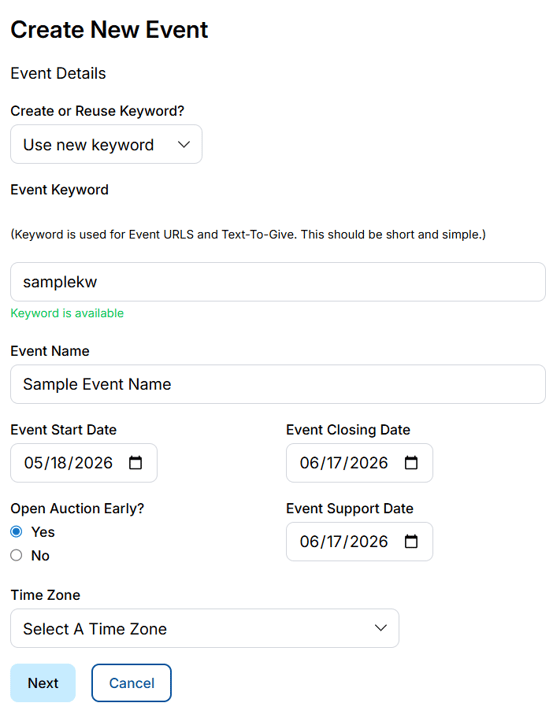
📝 Step 1: Event Details
This is where you set up the basic information for your event.
- In the Event Keyword field: enter a short, simple keyword for your event. This is used for your event URL and Text-To-Give.
- In the Event Name field: type the full name of your event.
- Set your Event Start Date: the date and time bidding opens.
- Set your Event Closing Date: the date bidding ends.
- Choose whether you want to Open Auction Early by selecting Yes or No. This allows guests to browse items before bidding officially begins.
- Set your Event Support Date: This should be the date you would like a ClickBid team member available on call, typically the day of your event when bidding closes.
- Select your Time Zone from the dropdown.
- Click Next to continue.
💡 Keep your keyword short and easy to remember, something like "fallgala" or "springauction". Bidders will use it to find your event, and it appears in your event URL and Text-To-Give number. If you have a previous keyword you'd like to reuse, select it from the Create or Reuse Keyword dropdown instead of typing a new one.
🚨Changing your keyword after your event goes live will break any existing links to your landing page. Choose it carefully before sharing your event publicly.
👥 Step 2: Event Administrator Info
This step assigns full Organization Admin permissions to a person who will manage the event.
- If you'd like to assign permissions to someone already in your system, select their name from the Give permissions to an existing user? dropdown. Their contact info will fill in automatically.
- If you're adding someone new, leave the dropdown set to No, enter info below and fill in:
- First Name
- Last Name
- Phone
- Click Next to continue
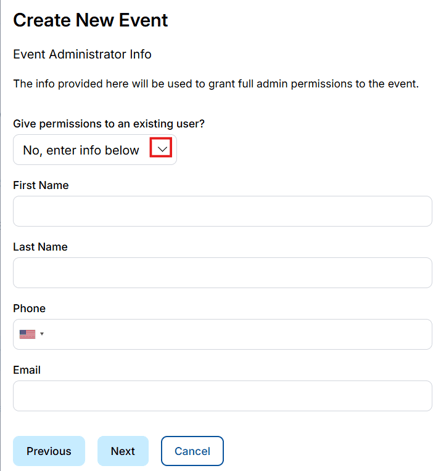
📌 The person listed here will receive full admin access to the new event. Make sure their contact information is accurate so they can receive event-related communications.
Info: You can add more users later, this just sets your initial admin(s).
⚙️ Step 3: Event Content
This step lets you choose whether to start fresh or copy data from an existing event.
- In the Do you want to copy data from an existing event? dropdown, choose one of the following:
- No, start with default data: starts your event from scratch with ClickBid's default settings.
- Yes, copy data from an active event: select an existing active event from the list.
- Yes, copy data from an inactive event: select a previously archived event from the list.
- If you choose to copy from an existing event, a list of copy options will appear. Check any of the following you'd like to bring over:
- Merchant Account: copies your payment processing setup including previous banking information for Payouts.
- Auction Settings: copies your event configuration settings
- Bidders: copies your bidder list
- If you are selling tickets or allowing bidder registration, we recommend starting fresh rather than keeping past bidder records for the best attendee experience.
- Bidder Custom Questions: Custom questions from the New Bidder Registration form will be copied over..
- Items and Item Donors: copies auction items and their donor info
- Item/Item Donor Custom Questions: custom questions from both the items and the Donate Item form will be copied over.
- Landing Page Settings: copies your event landing page layout
- Ticket Pages: copies your ticket page setup
- Ticket Custom Questions: Custom questions from Tickets, Sponsorships, and Underwriting will be copied over.
- Table Seating: copies your seating chart configuration
- Move all ticket sales from the selected event to the new event: this will remove the ticket sales from the selected event and cannot be undone
- Donation/TTG Settings: copies your donation/ttg settings
- Donation/TTG Custom Questions: Custom questions from Donations and TTG will be copied over.
- Composed Texts: copies saved text message templates
- Composed Emails: copies saved email templates
- Custom CSS: copies any custom styling applied to your event
- Click Next to continue.
⚠️ If you choose to Move all ticket sales from an existing event to the new one, that action cannot be undone. Ticket sales will be permanently removed from the original event.

If you select a previous event:
-
Use the arrow to populate previous events to allow you to choose the event you want to copy from.

🗒️When copying Ticket Pages: ticket types, sponsorships, and underwriting options may carry over; however, custom questions associated with these items are not copied.
Custom questions must be recreated manually in the new event. This ensures that all data collection fields are properly configured and aligned with the new event’s setup.Check the boxes for the data you want to copy over (e.g., items, settings, merchant account)

💡 Tip: If you're reusing the same bank account, make sure to check "Merchant Account" to retain your payout details. Copying your Merchant Account from a previous event is a great time-saver, it means you won't have to reconnect your payment processor for the new event.
✅ Step 4: Confirm and Save
The final screen shows a summary of everything you've entered. Review it carefully before saving.
- Review your Event Details: name, keyword, dates, and time zone.
- Review your Contact Info: the administrator assigned to this event.
- Review your Event Content: confirm what data is being copied, if applicable.
- If anything looks off, click the Edit button next to that section to go back and make changes.
- When everything looks good, click Save Event.
📌 Info: If you’re an Organization Admin, you and all existing users will automatically get access to the new event.
🛠️ Step 6: Begin Event Setup
Once your event is saved, you will be prompted to add Users and set event permissions. From there, go to the Events tab where your new event will appear. You can then begin setting up your event, adding items, configuring tickets, and customizing your landing page by clicking the “Event Admin” button.
➡️ Go To Event Admin

This opens your new event's admin dashboard where you can:
-
Configure settings
-
Upload items
-
Set up registration, payment, and checkout tools
-
Customize your landing page and messaging