The Send Invoice feature gives your attendees the option to receive an invoice and pay later, offering greater flexibility during checkout. This guide covers how to enable the setting, what your attendees will see, and how to manage these transactions in your admin panel.
⚙️ Enabling the “Send Invoice” Setting
When setting up your Ticket Page:
-
Go to:
**Ticket Page Settings**➡️**Payment Types**➡️**Send Invoice** -
Default setting:
"No" -
To allow invoice-based payments, set it to "Yes"

⚠️ RSVP tickets will always display the “Send Me an Invoice” option, even if this setting is “No”.
🛒 Attendee Experience at Checkout
For Self-Purchase Tickets
-
At checkout, the buyer selects: Send Me an Invoice

2. After submitting the form/purchase:

-
- They receive an email with:
- A link to pay the invoice (auto-filled credit card form)
- A PDF invoice attached
- They receive an email with:
For RSVP Tickets
-
The Send Me an Invoice option is always visible

-
Once submitted:
-
The same email and invoice experience as self-purchase applies
-
Buyer can pay via credit card using the secure link
-
PDF invoice is included in the email
-
📥 Invoice Email & Payment Flow
When buyers receive the invoice email:
-
Clicking the payment link opens a secure payment page

-
- 💳 Purchaser Detail fields are automatically pre-filled
 2. The attached PDF invoice can be:
-
-
Downloaded
-
Printed
-
Paid later
-

🖼️ Invoice Branding & Customization (NEW)
Invoices now support additional customization to match your organization’s branding and communication style.
- Your organization logo will appear on the invoice (similar to receipts).
- You can customize the Invoice Email Message:
- Go to Ticket Page Settings
- Go to Customizable Content
- Locate Invoice Email Message
- Enter your custom message

Sample additional information added to 'Invoice Email Message'
When adding information to the invoice email it will display like this: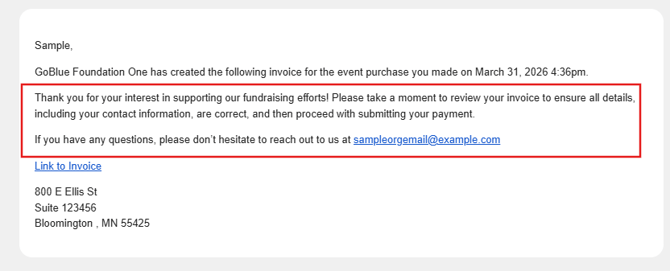
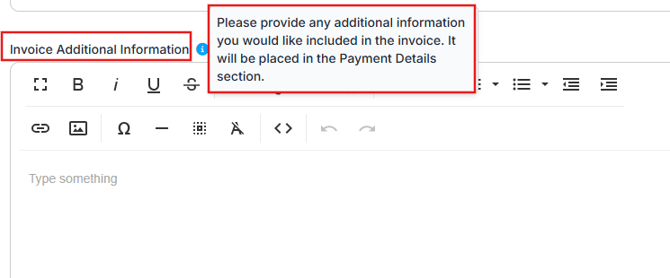
- You can also add Invoice Additional Information:
- This appears in the Payment Details section of the invoice
- Useful for payment instructions or contact details
Sample with text added to Invoice Additional Information field: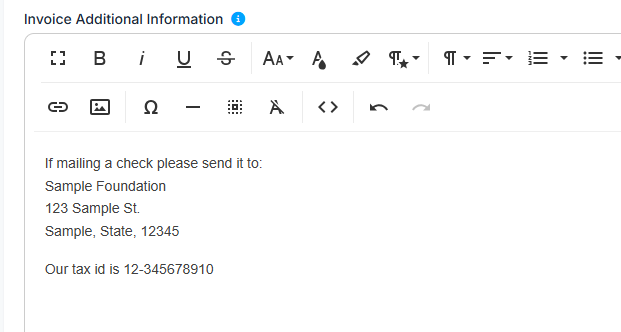
Sample PDF with details added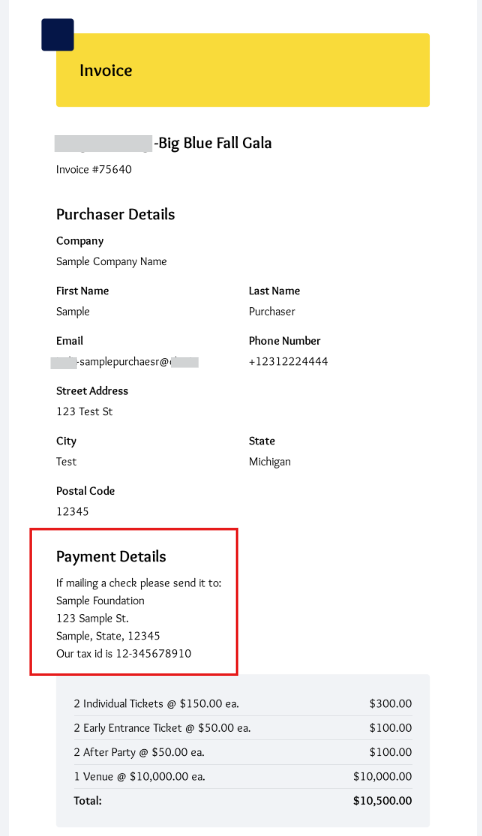
Sample of payment details from clicking the invoice link on the email: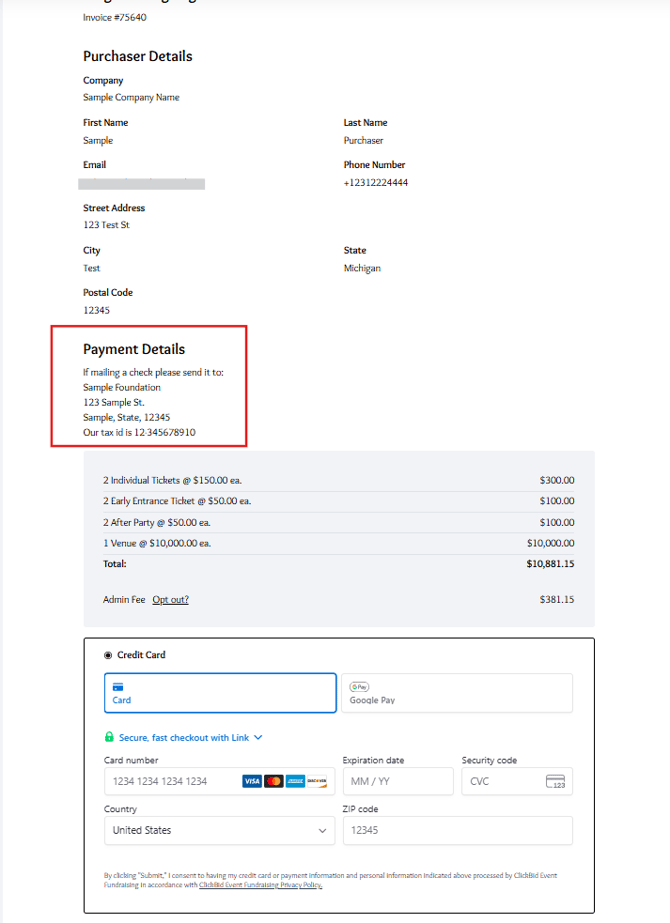
If no custom message is added, a default message will be included in the invoice email.
📊 Managing Invoices in View Ticket Sales
From the View Ticket Sales screen, you have several tools available to help manage invoice payments and attendee details.
🔍 Column Options
-
Email and Phone Number can be toggled on using the Show/Hide Columns menu

- The vertical ellipsis (⋮) to the far right on each row provides quick access to additional actions, including sending invoice links

🖊️ Accessing Ticket Details
- Click the edit pencil icon to open full ticket details

-
Inside the Additional Functions section:
-
🔗 Guest Update Link
-
✉️ Send Invoice Email (manually send or resend)
-
☑️ Paid Checkbox to mark the invoice as paid
(This updates the payment status in View Ticket Sales)
-

Marking a ticket as paid will update the payment status in View Ticket Sales.
🔁 Batch Sending Invoice Links (NEW)
You can send invoice payment links to multiple attendees at once.
- Go to View Ticket Sales.
- Select multiple invoice-based ticket sales by checking the box next to first name
- Scroll down to Batch Update
- Locate & check the box next to Send Invoice Payment Link
- Type Send Invoice
- This will confirm that you want to send the links
- Click Update.

- Info bubble displays:
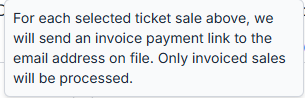
This will send an invoice payment link to each selected attendee with an email on file. Only invoiced sales will be included.
💵 Handling Offline Payments (Self-Checkout)
Paying by Check or Cash
-
If someone checks out with Check or Cash, their purchase appears as Unpaid
-
You can then:
-
Send them an invoice to pay online with their Credit Card.
-
Or, if they pay offline via check/cash, go to the edit icon
 >Details> Additional Details> check the Paid checkbox to manually mark it as paid
-
Switching Payment Methods
If a buyer initially selects Cash or Check, but later uses their invoice link to pay by Credit Card:
-
🌀 The payment type automatically updates in View Ticket Sales, no manual edits are needed as long as the invoice has not been marked as paid.
-
If it has already been marked as paid and you need to allow credit card payment, go to Details, uncheck Paid, and resend the invoice.
Once an invoice is marked as paid, the invoice link will expire.
A new link will need to be generated and sent from View Ticket Sales.
🔄 Switching Check/Cash Payment Types to Invoice (NEW)
You can convert an existing ticket sale to an invoice if needed.
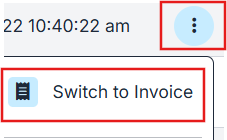
- In View Ticket Sales, locate the ticket.
- Open the ⋮ (ellipsis) menu.
- Click Switch to Invoice.
- Confirm the action.

If switching from Check or Cash, make sure the Paid status is unchecked by clicking edit ![]() then go to details: under Pay Type is 'Paid?' uncheck that box.
then go to details: under Pay Type is 'Paid?' uncheck that box.
You can not change a Credit Card Payment to invoice without refunding the payment.
After switching:
- Confirm the email address
- Manually send the invoice using Send Invoice Email
⚙️ Additional Actions & Menu Updates (NEW)
- The action menu at the end of each row now uses a vertical ellipsis for consistency.
- Menu options include clearly labeled actions such as:
- Refund
- View Receipt
- Email Receipt
- Email Guest Update Link
- Email Invoice
- Switch to Invoice
- If this is a Check or Cash payment you can switch to send an invoice as long as it's marked 'Unpaid', if marked 'paid' go to edit>uncheck the paid under details.
This makes it easier to quickly manage ticket sales.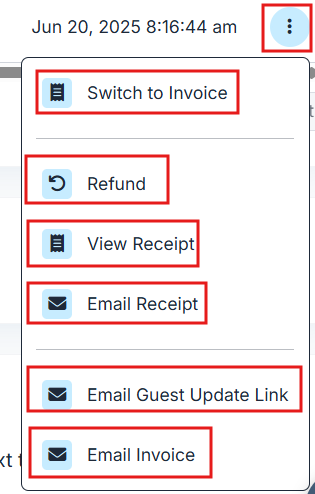
✅ Summary
This new Send Invoice feature enhances flexibility for ticket buyers and simplifies payment tracking for organizers. By utilizing these settings and tools, you can ensure smooth transaction flows and accurate sales reporting.