🔗 Connection
To connect a ClickBid event to your Salesforce account, go to Integrations > Dashboard. You will see a Salesforce card with the description "Send sales and bidder data to your existing Salesforce account" and a Connect button to start the process.
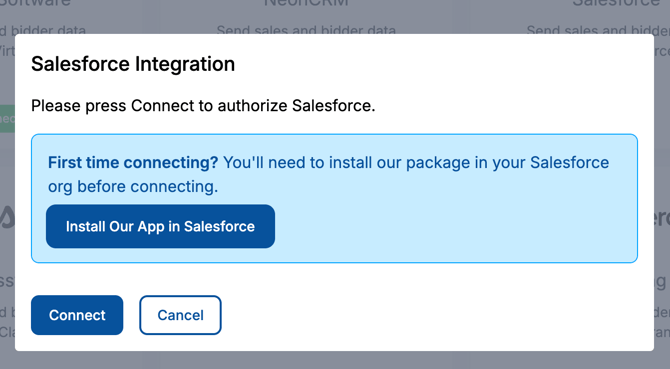
ClickBid is in the approval process for listing on the AppExchange at Salesforce. Until we are listed, you will need to click on the “Install Our App in Salesforce” button and approve. Do this before pressing “Connect”
Salesforce uses OAuth for authentication, so there's no API key to paste. The screen will prompt: "Please press Connect to authorize Salesforce." When you click Connect, you'll be redirected to Salesforce to sign in and approve the connection. After you authorize, you'll be returned to ClickBid and the card will show a blue Connected button.
ℹ️ You must sign in with a Salesforce user that has permission to install apps and create records. If your sign-in does not have those rights, ask your Salesforce admin to complete the connection.
⚙️ Settings
This is your starting point for the integration, configure how and when data flows between ClickBid and Salesforce.
Go to Integrations > Salesforce > Settings.
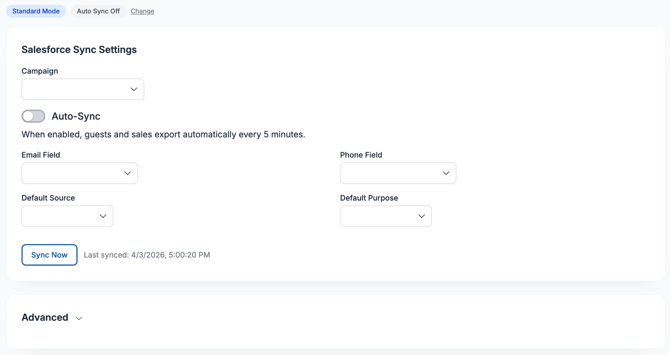
Salesforce Sync Settings
- Campaign: Select which Salesforce campaign this event is tied to. Sales, contacts, and attendees will be associated with this campaign when exported.
- Auto-Sync: When enabled, guests and sales export automatically every 5 minutes. This is useful for keeping your records current during a live event without manual effort.
- Email Field: Choose which Salesforce email field on Contact (or Person Account) ClickBid should write bidder email addresses to.
- Phone Field: Choose which Salesforce phone field ClickBid should write bidder phone numbers to.
- Default Source: Pre-fills the Source field on exported sales (e.g., Silent, Live, Fund-A-Need).
- Default Purpose: Pre-fills the Purpose field on exported sales.
- Sync Now: Triggers a manual sync immediately. Use this if you need to push data right away rather than waiting for the next auto-sync cycle.
💡Set Campaign, Default Source, and Default Purpose before your event begins so exports are categorized correctly in Salesforce from the start.
Advanced
Expand the Advanced section to manage how ClickBid talks to your Salesforce org under the hood.
Integration Mode
- Mode: Choose how ClickBid records flow into Salesforce:
- Standard (Contact + Opportunity): Bidders become Contacts; sales become Opportunities. Use this for standard Salesforce orgs.
- Nonprofit Cloud (Person Account + Gift Transaction): Bidders become Person Accounts; sales become Gift Transactions. Use this if you're on Salesforce Nonprofit Cloud.
⚠️ Choose your Mode before you start exporting. Changing it mid-event can create duplicate records on the Salesforce side.
ClickBid Package
The ClickBid managed package adds custom objects to your Salesforce org for richer data tracking.
- Status: Shows whether the ClickBid managed package is Installed or not detected in your org.
- Detect Package: Re-scans your Salesforce org to confirm the package is present.
- Setup Related Lists: Adds the ClickBid related lists to your Contact / Person Account page layouts so synced data is visible to your team.
Attendee & Event Data
Sync event summary data (revenue totals, bidder/attendee counts) and attendee participation back to Salesforce after your event.
- Send Attendee & Event Data: Pushes the post-event summary and attendee participation records into Salesforce.
⚠️ Do not use Send Attendee & Event Data until your event has ended and all auction item and donation checkouts are fully complete. Running this too early may result in incomplete records in Salesforce.
🗺️ Data Mappings
Data Mappings let you route specific ClickBid fields into custom fields you've already set up in Salesforce.
Go to Integrations > Salesforce > Data Mappings.
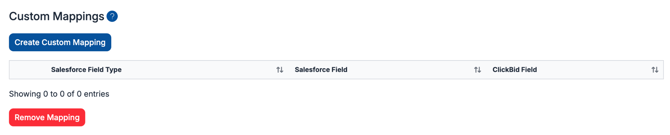
Custom Mappings
To create a custom mapping, click Create Custom Mapping and choose the Salesforce Field Type, the Salesforce Field, and the corresponding ClickBid Field. To remove a mapping, check the box next to it and click Remove Mapping.
ℹ️ Custom fields must already exist in Salesforce before you can map to them. Set up any needed custom fields on Contact, Person Account, Opportunity, or Gift Transaction in Salesforce first, then return here to create the mapping.
💡The default Email Field and Phone Field used for bidders aren't configured here, they live under Settings > Salesforce Sync Settings.
📥 Import Bidders
Import Bidders lets you pull your existing Salesforce contacts into ClickBid as bidders so they don't have to register themselves.
Go to Integrations > Salesforce > Import Bidders.
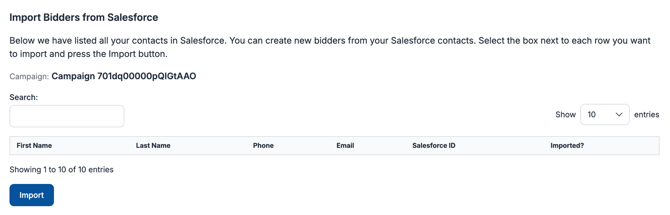
ClickBid displays all contacts from your connected Salesforce account, filtered to the campaign you've chosen. You can search by name or email to find specific donors.
- Confirm the Campaign shown at the top of the page is correct (set this under Settings if you need to change it).
- Use the Search field to filter the list if needed.
- Check the box next to each contact you want to import.
- Click Import.
ℹ️ The Imported? column shows which contacts have already been brought into ClickBid, so you can avoid creating duplicates.
📤 Export Bidders
Export Bidders sends your ClickBid bidder records to Salesforce, either as new contacts or linked to existing ones.
Go to Integrations > Salesforce > Export Bidders.
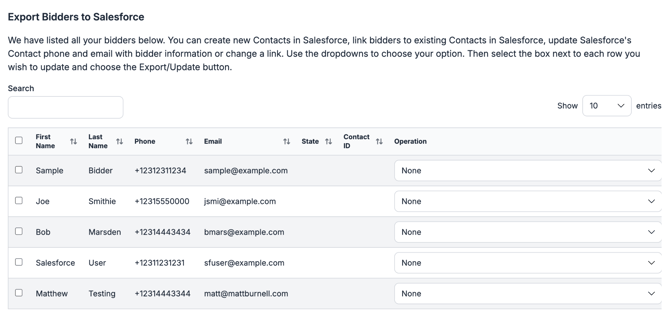
ClickBid lists all bidders in your event. For each bidder, use the Operation dropdown to choose what action to take:
- Add New Contact in Salesforce: Creates a brand-new Contact (or Person Account, in Nonprofit Cloud mode) using the bidder's information.
- Link to Existing Salesforce Contact: Connects this bidder to a Contact that already exists in Salesforce.
- Update Salesforce Contact Email: Updates the email address on the linked Salesforce record with the bidder's current email.
- Update Salesforce Contact Phone: Updates the phone number on the linked Salesforce record.
- Update Both Phone & Email: Updates both contact fields at once.
- Remove Link: Disconnects this bidder from their linked Salesforce record.
- Add/Update Salesforce Contact: Creates a new Contact if no match is found, or updates the linked Contact if one already exists.
Once you've set the operation for each bidder you want to act on, check the boxes next to those rows and click Export/Update.
💡 Bidders who were imported from Salesforce will already have a Salesforce Contact ID and won't need to be exported as new contacts.
💰 Export Sales
Export Sales sends completed auction sales and donations from ClickBid into Salesforce as Opportunities (Standard mode) or Gift Transactions (Nonprofit Cloud mode).
Go to Integrations > Salesforce > Export Sales.
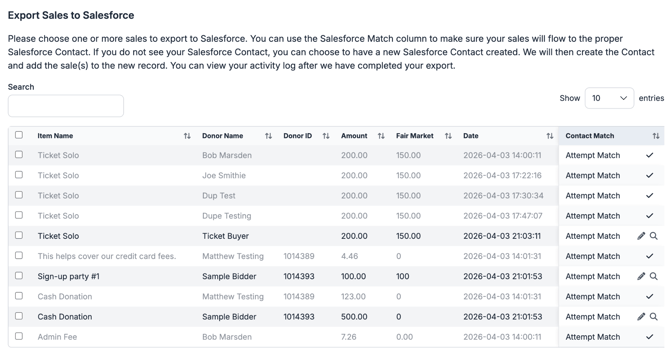
ClickBid lists all sales from your event, including the item name, donor name, donor ID, amount, fair market value, date, phone, email, and pay type. The Contact Match column shows whether a Salesforce contact has been identified for that donor.
- Review the Contact Match column. If an existing Salesforce contact is shown, the sale will be added to that record. If no match is found, ClickBid will create a new Salesforce contact for that donor when you export.
- Check the box next to each sale you want to export.
- Click Export Sales.
To reset previously exported sales so they can be exported again, click Clear Export(s) and confirm in the dialog.
💡 Any defaults you set under Settings > Salesforce Sync Settings (Campaign, Default Source, Default Purpose) will be applied automatically to each sale you export here.
⚠️ After exporting, use the Activity Log to confirm all records were processed successfully before closing out your event.
🪑 Export Guests
Export Guests sends your event ticket holders to Salesforce as Contacts and links them to your Salesforce Campaign.
Go to Integrations > Salesforce > Export Guests.
ClickBid displays your event guests with their first name, last name, email, phone, ticket type, table assignment, and Contact ID. Guests are matched to existing Salesforce contacts by email address. If a matching email is found, the guest will be linked to that contact rather than creating a duplicate.
- Check the box next to each guest you want to export.
- Click Export.
ℹ️ Attendees without an email address cannot be exported. Email is the matching key Salesforce uses to link guests to Contacts and the Campaign.
ℹ️ This feature is designed for event ticket holders (guests), not bidders. Use Export Bidders for your auction participants.
📋 Activity Log
The Activity Log gives you a complete record of everything that has been sent to Salesforce from ClickBid.
Go to Integrations > Salesforce > Activity Log.
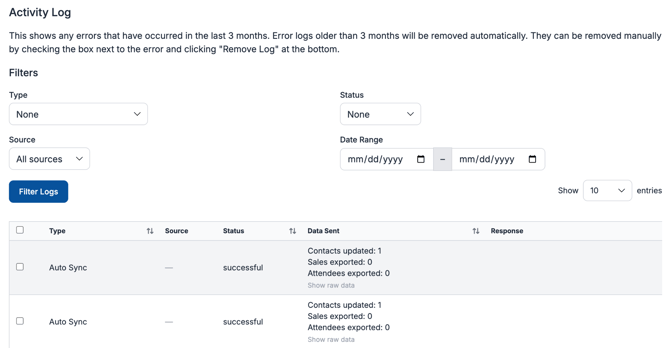
Each entry shows the Type of action, the Source (Auto Sync or Manual), the Status (Successful, Failure, or Pending), the Data Sent, Salesforce's Response, and the Date. Click Show raw data on any row to expand the full payload for that entry.
You can filter log entries using the controls at the top of the page:
- Type: Bidder Export, Sale Export, Bidder Import, Auto Sync, Recurring Donation Sync, Attendee Export, or Sale Export Cleared.
- Status: Successful, Failure, or Pending.
- Source: All sources, Auto Sync, or Manual.
- Date Range: Limit results to a specific window.
Click Filter Logs to apply your selections.
Log entries are kept for 3 months and then removed automatically. You can also remove entries manually by selecting them and clicking Remove Log.
ℹ️ If an export shows a Failure status, check the Response column for details. Common causes include a missing Salesforce contact match, the wrong Integration Mode for your org, or a required custom field that wasn't filled in.
🛑 500 Error Message
This usually means the integration is broken, often due to a changed Salesforce password.
-
Go to Integrations > Dashboard.
-
On the Salesforce card, click the blue Connected button to disconnect.
-
Reconnect by clicking the green Connect button and re-entering your credentials.
✅ Summary
The Salesforce integration gives you a complete toolset for connecting your ClickBid event to your donor database, before, during, and after your event. You can import existing contacts as bidders, keep records in sync automatically throughout the evening, and push all sales, guest data, and attendee participation back to Salesforce when the event wraps up. The Activity Log makes it easy to verify that everything transferred correctly.