---
title: 🔗 How to Set Up and Use the DonorPerfect Integration in ClickBid
description: ClickBid now integrates with DonorPerfect, making it easier to connect fundraising and donor information while simplifying your event workflow.
---
[Skip to content](https://support.cbo.io/donorperfect-crm#main-content)

- [Blog](https://blog.cbo.io/)
- [ClickBid Admin](https://cbo.io/admin/login.php)
Open main navigation
Close main navigation
- [Blog](https://blog.cbo.io/)
- [ClickBid Admin](https://cbo.io/admin/login.php)
- [View our Training Videos](https://training.clickbidonline.com/all-courses/)
[View our Training Videos](https://training.clickbidonline.com/all-courses/)
Welcome to ClickBid's Knowledge Base
- There are no suggestions because the search field is empty.
1. [ClickBid How To Articles](https://support.cbo.io/?hsLang=en)
2. [Integrations + Partners](https://support.cbo.io/integrations-partners?hsLang=en)
3. [Donorperfect](https://support.cbo.io/integrations-partners?hsLang=en#donorperfect)
# 🔗 How to Set Up and Use the DonorPerfect Integration in ClickBid
#### 🔗 How to Set Up and Use the DonorPerfect Integration in ClickBid
The DonorPerfect integration connects your ClickBid event to your DonorPerfect database so donor records, bidder information, and event sales flow between the two systems without manual re-entry. Once connected, you can import existing donors as bidders, export bidders back to DonorPerfect, push event sales as gifts, and set up automatic syncing on a schedule.
---
#### ✅ Before You Start
You will need the following before connecting:
- An active DonorPerfect account with API access enabled
- A DonorPerfect API key with permission to read donors and campaigns, create and update donors, and create gifts
- ClickBid event admin access to the Integrations page
---
#### 🔌 Step 1: Connect DonorPerfect to ClickBid
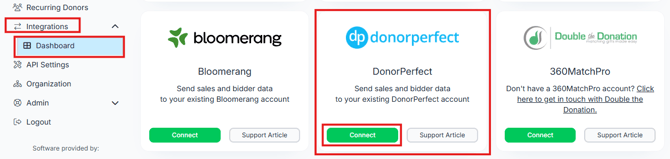
1. In the left-hand navigation, click **Integrations** to expand the menu.
2. Click **Dashboard**.
3. Find **DonorPerfect** and click **Connect**.
4. Enter your **DonorPerfect API Key** when prompted.
5. ClickBid will validate the key and store the connection for your event.
Once connected, the full DonorPerfect menu will appear in your left-hand navigation under **Integrations**, including Settings, Data Mappings, Import Bidders, Export Bidders, Export Sales, and Activity Log.
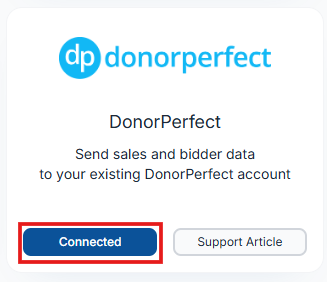
To disconnect at any time, return to the Integrations Dashboard and click **Connected** on the DonorPerfect card.
💡**To locate your DonorPerfect API Key:** Log in to your DonorPerfect account and go to **Settings \> User Management**. Click the **edit icon** next to your username, then scroll to the **API Self Service** section to find or generate your API key.
---
#### ⚙️ Step 2: Configure Sync Settings
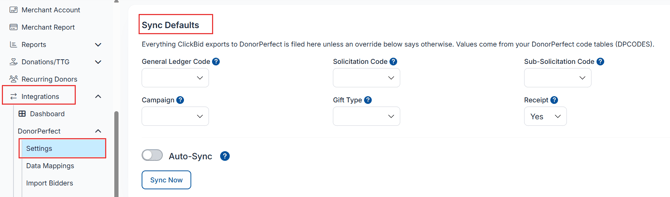
1. Go to **Integrations \> DonorPerfect \> Settings**.
**Auto-Sync**: toggle this on to automatically export donors and sales to DonorPerfect every 5 minutes without any manual action. You can also click **Sync Now** to run a sync on demand at any time.
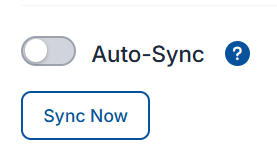
⚠️ **Sync Now** only pushes records if Auto-Sync is turned on for the relevant record types. If Auto-Sync is off, Sync Now will complete without sending any data. Turn on Auto-Sync for bidders and/or sales before using Sync Now.
---
#### 🎁 Step 3: Set Up Export Defaults
Before exporting sales, configure how gifts should be recorded in DonorPerfect. These defaults apply to every exported gift unless a gift-type mapping overrides them for a specific transaction type.
1. Go to **Integrations \> DonorPerfect \> Settings**.
2. Scroll down to the **Gift Export Defaults** section.
3. Set your defaults for the following fields:
- **General Ledger Code**: the GL code for exported gifts
- **Solicitation Code**: the solicitation code for exported gifts
- **Sub-Solicitation Code**: optional sub-solicitation code
- **Campaign**: the DonorPerfect campaign to attribute gifts to
- **Gift Type**: the payment method type in DonorPerfect
- **Receipt**: whether exported gifts should be flagged for receipting in DonorPerfect
**Export Mapping Overrides**: if you need different routing for different transaction types, use the **Export Type Overrides** table to set specific GL codes, solicitation codes, campaigns, and gift types for Auction Wins, Donations, Tickets, Raffles, and Fixed Price sales separately. Leave any field as **-- None --** to fall back to the event default for that field.
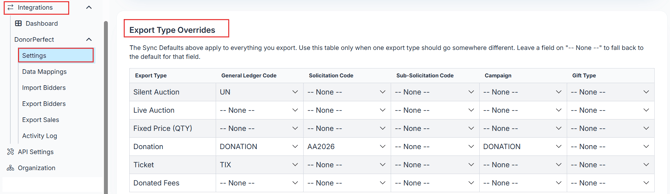
💡Precedence works like this: a per-export override set at the time of export takes priority, then gift-type mapping rules, then the event-wide defaults. Set your defaults first, then add overrides only where needed.
---
#### 🗺️ Step 4: Configure Data Mappings (Optional)
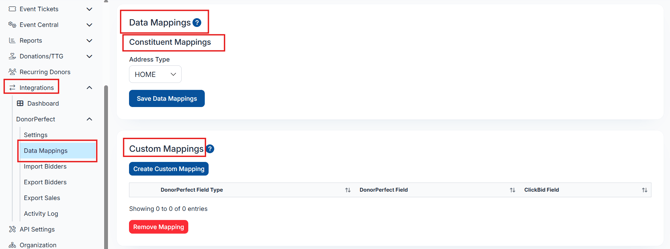
Data Mappings control where contact information lands in DonorPerfect when bidders are exported.
1. Go to **Integrations \> DonorPerfect \> Data Mappings**.
2. Under **Constituent Mappings**, set the **Address Type,** for example: Home, Work, or Vacation, to control which DonorPerfect address slot receives the bidder's contact details.
3. Click **Save Data Mappings**.
**Custom Mappings**: if you want to map specific ClickBid fields to DonorPerfect User-Defined Fields (UDFs), use the **Custom Mappings** section.
1. Click **Create Custom Mapping**.
2. Select the **DonorPerfect Field Type**: Donor or Gift.
3. Select the **DonorPerfect Field** you want to map to.
4. Select the **ClickBid Field** to map from. Options include Bidder Number, Bidder Table Number, Item Name, Item Number, Item FMV, Item Category, and more.
5. Click **Create**.
To remove a custom mapping, check the box next to it and click **Remove Mapping**.
---
#### 📥 Step 5: Import Donors as Bidders (Optional)
If you want to pull existing DonorPerfect donors into your event as bidders before the event:
1. Go to **Integrations \> DonorPerfect \> Import Bidders**.
2. Browse or search the list of your DonorPerfect donors.
3. Check the box next to each donor you want to import.
4. Click **Import** and confirm.
Imported donors are linked to their DonorPerfect record so any future activity in ClickBid syncs back to the correct DonorPerfect constituent.
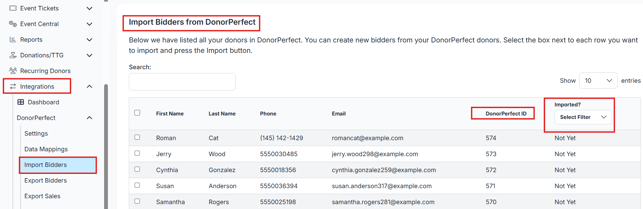
ℹ️ The integration matches imported donors to existing ClickBid bidder records where possible to avoid creating duplicates.
---
📤 Step 6: Export Bidders to DonorPerfect
After your event, push ClickBid bidders to DonorPerfect as constituent records.
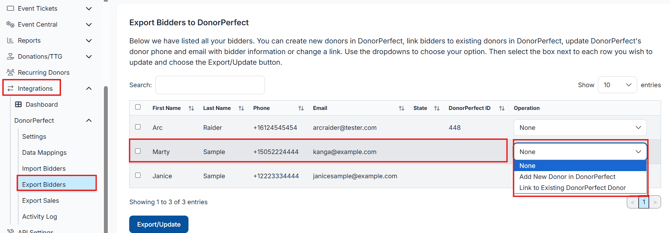
1. Go to **Integrations \> DonorPerfect \> Export Bidders**.
2. Browse or search the list of your bidders.
3. For each bidder, use the **Operation** dropdown to choose what should happen in DonorPerfect:
| Operation | What it does |
| --- | --- |
| Add New Donor in DonorPerfect | Creates a new constituent record |
| Link to Existing DonorPerfect Donor | Connects the bidder to an existing record without creating a duplicate |
| Update DonorPerfect Donor Email | Updates the linked donor's email address |
| Update DonorPerfect Donor Phone | Updates the linked donor's phone number |
| Update Both Phone and Email | Updates both contact fields |
| Remove Link | Unlinks the bidder from DonorPerfect |
4. Check the boxes next to the bidders you want to process.
5. Click **Export/Update** and confirm.
💡Use **Link to Existing DonorPerfect Donor** for anyone who is already in your DonorPerfect database. This prevents duplicate constituent records and keeps your data clean.
Options for: Existing Constituent already added Donorperfect ID
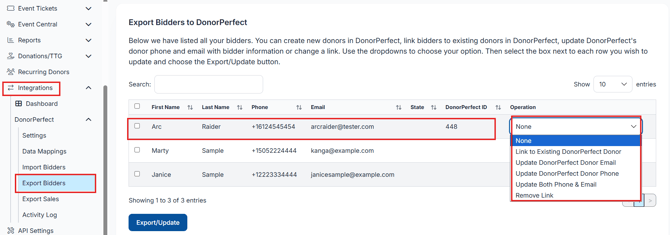
Options for: Adding a new constituent or linking to one already in Donorperfect
---
#### 💰 Step 7: Export Sales to DonorPerfect
Push auction purchases and donations to DonorPerfect as gifts attributed to the correct donor.
1. Go to **Integrations \> DonorPerfect \> Export Sales**.
2. Browse or search the list of sales.
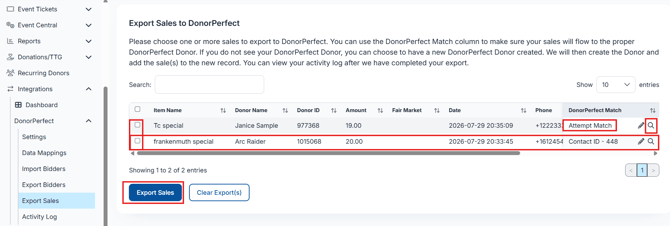
3. For each sale, check the **DonorPerfect Match** column to confirm the sale will be attributed to the correct donor. If no match is shown, you can choose **Create New Contact** to have a new donor record created automatically.
4. Check the boxes next to the sales you want to export.
5. Click **Export Sales**.
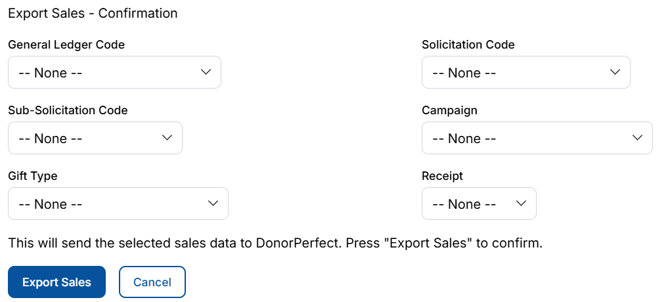
6. In the confirmation window, review or override the gift routing fields (GL Code, Solicitation Code, Sub-Solicitation Code, Campaign, Gift Type, and Receipt) for this specific export. These override your defaults for this batch only.
7. Click **Export Sales** to confirm.
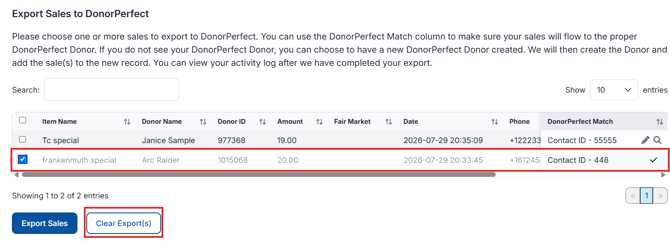
ℹ️ Once a sale has been exported, it is marked as exported in ClickBid. If you need to re-export a sale, use the **Clear Export(s)** button to reset its status first. Note that re-exporting may create a duplicate gift record in DonorPerfect, the Clear Export button only resets the status in ClickBid and does not change anything in DonorPerfect.
- **Attempt Match** means ClickBid was unable to automatically match this record to a DonorPerfect constituent. Click the **magnifying glass** to resolve, from there you can create a new constituent or select from the list of suggested matches.
- If none of the suggestions are correct but you know the constituent exists in DonorPerfect, look up their constituent ID in your DonorPerfect account, then return to ClickBid and click the **pencil icon** to enter the ID manually before exporting your sale.
---
#### 📋 Step 8: Monitor with the Activity Log
The Activity Log records every sync action: imports, exports, auto-sync runs, and errors, so you can confirm what synced and troubleshoot anything that did not.
1. Go to **Integrations \> DonorPerfect \> Activity Log**.
2. Use the filters to narrow by **Type** (Bidder Export, Sale Export, Bidder Import, Auto Sync), **Status** (Successful, Failure, Pending), **Source** (Auto Sync or Manual), or **Date Range**.
3. Click **Filter Logs** to apply your filters.
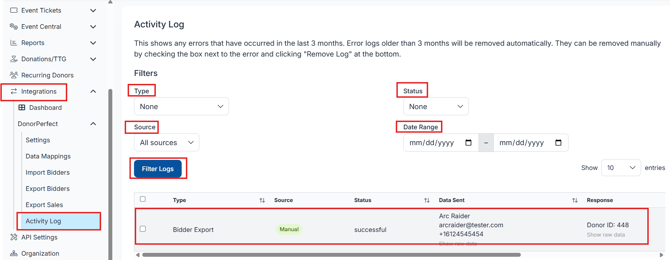
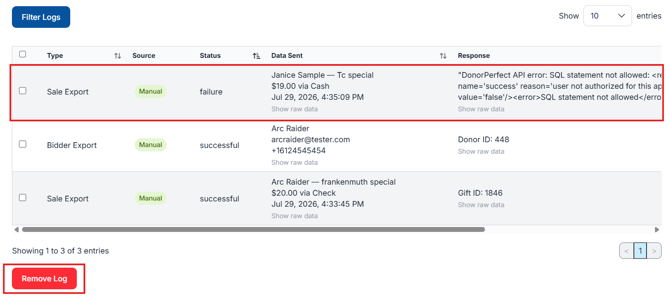
- If you see failures, the **Response** column will show the error message returned from DonorPerfect to help you diagnose the issue. Logs older than 3 months are removed automatically, or you can remove them manually by checking the box next to a log entry and clicking **Remove Log**.
#### ⚠️ Things to Keep in Mind
The DonorPerfect integration does not currently support exporting ticket attendees as DonorPerfect event participants or syncing recurring donation schedules. Gift routing for different transaction types is handled through gift-type mapping overrides and event defaults rather than a separate event-linking step.
---
### ❓Troubleshooting
#### 💬 What does "SQL statement not allowed" mean when I export bidders?
If you see this error during an export:
> *DonorPerfect API error: SQL statement not allowed: \\\SQL statement not allowed\\*
Don't worry, your connection to DonorPerfect is working. This message comes directly from DonorPerfect and means your **API key** doesn't have the permission level needed to complete the export.
**To fix it:**
1. Contact **DonorPerfect Support** and ask them to enable **API SQL access** on your account's API key. (They may issue you a new key with the correct permissions.)
2. Once enabled, go to **Integrations \> DonorPerfect \> Settings** in your ClickBid admin.
3. Re-enter or re-save your **API key**.
4. Return to **Export Bidders** and try your export again.
💡 If your organization recently regenerated its DonorPerfect API key, the key saved in ClickBid may be outdated. Re-saving the current key in your DonorPerfect Settings page often resolves this on its own.
ℹ️ This permission is managed entirely by DonorPerfect. ClickBid Support cannot enable API SQL access on your behalf, but we're happy to help you verify your key is saved correctly.
- [Account & Setup](https://support.cbo.io/account-setup?hsLang=en#main-content)
- [Users & Logging In](https://support.cbo.io/account-setup?hsLang=en#users-logging-in)
- [Billing/Renewal](https://support.cbo.io/account-setup?hsLang=en#billing-renewal)
- [Organization Account](https://support.cbo.io/account-setup?hsLang=en#organization-account)
- [Event Settings](https://support.cbo.io/account-setup?hsLang=en#event-settings)
- [Auction Settings](https://support.cbo.io/account-setup?hsLang=en#auction-settings)
- [Welcome Page](https://support.cbo.io/account-setup?hsLang=en#welcome-page)
- [Get Started](https://support.cbo.io/get-started?hsLang=en#main-content)
- [Pre-Event Prep](https://support.cbo.io/get-started?hsLang=en#pre-event-prep)
- [Creating a New Event](https://support.cbo.io/get-started?hsLang=en#creating-a-new-event)
- [Event Day Toolkit](https://support.cbo.io/event-day-toolkit?hsLang=en#main-content)
- [Paddle Raise](https://support.cbo.io/event-day-toolkit?hsLang=en#paddle-raise)
- [Live Auction](https://support.cbo.io/event-day-toolkit?hsLang=en#live-auction)
- [Silent Auction](https://support.cbo.io/event-day-toolkit?hsLang=en#silent-auction)
- [Butler](https://support.cbo.io/event-day-toolkit?hsLang=en#butler)
- [Volunteer Training](https://support.cbo.io/event-day-toolkit?hsLang=en#volunteer-training)
- [Messaging](https://support.cbo.io/messaging?hsLang=en#main-content)
- [Text & Emails](https://support.cbo.io/messaging?hsLang=en#text-emails)
- [Chat Bidders](https://support.cbo.io/messaging?hsLang=en#chat-bidders)
- [Welcome Text, Text Bidders, & Email Bidders](https://support.cbo.io/messaging?hsLang=en#welcome-text-text-bidders-email-bidders)
- [Tickets & Sponsorships](https://support.cbo.io/tickets-sponsorships?hsLang=en#main-content)
- [Tickets, Sponsorships & Underwriting Overview](https://support.cbo.io/tickets-sponsorships?hsLang=en#tickets-sponsorships-underwriting-overview)
- [Reporting & Data](https://support.cbo.io/tickets-sponsorships?hsLang=en#reporting-data)
- [Manage Ticketed Guests](https://support.cbo.io/tickets-sponsorships?hsLang=en#manage-ticketed-guests)
- [RSVP & Invoicing](https://support.cbo.io/tickets-sponsorships?hsLang=en#rsvp-invoicing)
- [Items](https://support.cbo.io/items?hsLang=en#main-content)
- [Items Overview & Setup](https://support.cbo.io/items?hsLang=en#items-overview-setup)
- [Quantity Items / E-Commerce](https://support.cbo.io/items?hsLang=en#quantity-items-e-commerce)
- [Item Donation Form and Donors](https://support.cbo.io/items?hsLang=en#item-donation-form-and-donors)
- [FMV & Tax](https://support.cbo.io/items?hsLang=en#fmv-tax)
- [Peer to Peer and Donation Campaigns](https://support.cbo.io/peer-to-peer-and-donation-campaigns?hsLang=en#main-content)
- [Peer to Peer and Donation Setup](https://support.cbo.io/peer-to-peer-and-donation-campaigns?hsLang=en#peer-to-peer-and-donation-setup)
- [Recurring Donations](https://support.cbo.io/peer-to-peer-and-donation-campaigns?hsLang=en#recurring-donations)
- [Text to Give](https://support.cbo.io/peer-to-peer-and-donation-campaigns?hsLang=en#text-to-give)
- [Embed Your Donation Form](https://support.cbo.io/peer-to-peer-and-donation-campaigns?hsLang=en#embed-your-donation-form)
- [Appeal Display](https://support.cbo.io/peer-to-peer-and-donation-campaigns?hsLang=en#appeal-display)
- [Bidders](https://support.cbo.io/bidders?hsLang=en#main-content)
- [Bidder Setup](https://support.cbo.io/bidders?hsLang=en#bidder-setup)
- [Donor Thank You Letters](https://support.cbo.io/bidders?hsLang=en#donor-thank-you-letters)
- [Bidder Registration Custom Questions](https://support.cbo.io/bidders?hsLang=en#bidder-registration-custom-questions)
- [Reporting & Data](https://support.cbo.io/reporting-data?hsLang=en#main-content)
- [Event Reporting](https://support.cbo.io/reporting-data?hsLang=en#event-reporting)
- [Credit Card Processing & Payments](https://support.cbo.io/credit-card-processing-payments?hsLang=en#main-content)
- [Credit Card Processing & Payments](https://support.cbo.io/credit-card-processing-payments?hsLang=en#credit-card-processing-payments)
- [FAQs](https://support.cbo.io/credit-card-processing-payments?hsLang=en#faqs)
- [Merchant Account & Merchant Report](https://support.cbo.io/credit-card-processing-payments?hsLang=en#merchant-account-merchant-report)
- [Web Content / Event Landing Pages](https://support.cbo.io/web-content-event-landing-pages?hsLang=en#main-content)
- [Design & Customization](https://support.cbo.io/web-content-event-landing-pages?hsLang=en#design-customization)
- [Accepting Donations From Your Landing Page](https://support.cbo.io/web-content-event-landing-pages?hsLang=en#accepting-donations-from-your-landing-page)
- [EventStream Video Streaming](https://support.cbo.io/eventstream-video-streaming?hsLang=en#main-content)
- [Virtual Live Auction and Paddle Raise](https://support.cbo.io/eventstream-video-streaming?hsLang=en#virtual-live-auction-and-paddle-raise)
- [EventStream FAQ](https://support.cbo.io/eventstream-video-streaming?hsLang=en#eventstream-faq)
- [Integrations + Partners](https://support.cbo.io/integrations-partners?hsLang=en#main-content)
- [Neon One](https://support.cbo.io/integrations-partners?hsLang=en#neon-one)
- [Raiser's Edge NXT](https://support.cbo.io/integrations-partners?hsLang=en#raisers-edge-nxt)
- [Bloomerang](https://support.cbo.io/integrations-partners?hsLang=en#bloomerang)
- [Salesforce for Nonprofits](https://support.cbo.io/integrations-partners?hsLang=en#salesforce-for-nonprofits)
- [Charityproud](https://support.cbo.io/integrations-partners?hsLang=en#charityproud)
- [Classy](https://support.cbo.io/integrations-partners?hsLang=en#classy)
- [TravelPledge](https://support.cbo.io/integrations-partners?hsLang=en#travelpledge)
- [Double the Donation](https://support.cbo.io/integrations-partners?hsLang=en#double-the-donation)
- [HGA Fundraising](https://support.cbo.io/integrations-partners?hsLang=en#hga-fundraising)
- [Public API](https://support.cbo.io/integrations-partners?hsLang=en#public-api)
- [Zapier](https://support.cbo.io/integrations-partners?hsLang=en#zapier)
- [Virtuous](https://support.cbo.io/integrations-partners?hsLang=en#virtuous)
- [Charity Experiences](https://support.cbo.io/integrations-partners?hsLang=en#charity-experiences)
- [Donorperfect](https://support.cbo.io/integrations-partners?hsLang=en#donorperfect)
- [FAQs](https://support.cbo.io/faqs?hsLang=en#main-content)
- [FAQs](https://support.cbo.io/faqs?hsLang=en#faqs)
[](https://try.cbo.io)
ClickBid Training Hub
Copyright © 2026, ClickBid Event Fundraising