
Setting up user access in ClickBid keeps your team organized and your account secure. Whether you're adding a new volunteer coordinator, assigning admin roles, or cleaning up access after an event, this guide walks you through everything you need to know.
⚙️ Where to Manage Users
Users can be managed in two places depending on what level of access you need to set:
- Organization > Users: manage users across your entire organization and all events. This is where you assign Organization Admin roles and organization-wide permissions. You can add Event Admin roles here for all events.
- Event: Software Settings > Users (within a specific event): manage users at the individual event level. This is where you assign Event Admin roles and event-specific permissions.
➕ How to Add a New User
-
Go to the Organization page in your ClickBid account.
-
Click on the Users tab.
-
Select Create New User.
-
Enter the user's First Name, Last Name, and Email Address.
-
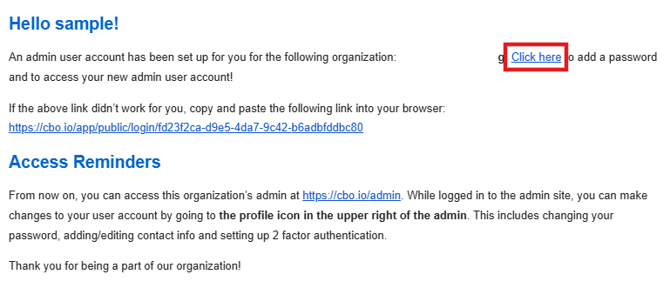
The new user will receive an email invite to set their password and log in.
-
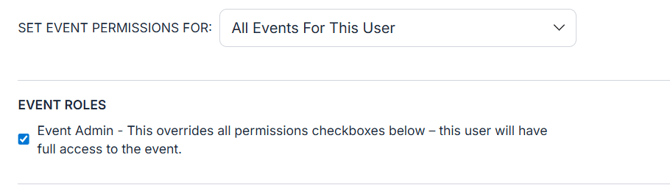
- Add Organization or Event Permissions to this new user.
- Permissions can be chosen based on account, or individual events.
- Organization Admin Role will give the user complete and full access of everything in your ClickBid account.
- Event Admin Role will give the user complete and full access of all events.
ℹ️New users start with only Training permissions by default. You will need to manually select any additional permissions you want them to have, or assign them an admin role.

🚨Users cannot edit their own permissions. Someone with a role equal to or higher than theirs must make permission changes on their behalf.
🔐 Understanding Admin User Roles
When you add a user, you can assign a role, which controls what parts of the system they can access.
Default User Permissions are only the training permissions. You will have to manually select the permissions you want the user to have.
-
Organization Admin Role
-
Full access to all organization settings, all events, recurring donors, and making payments for renewing or upgrading your license.
- Able to create and delete other Users with permissions less than or equal to theirs.
- If an Organization Admin needs to be changed, the current Organization Admin can make this change under Organization > Users > Organization Roles.
-
-
Event Admin Role
-
Can manage all event info, items, bids, and auction data, but not organization settings. Has full permissions within the assigned event, regardless of individual permissions checked
- Can create other Event Admins and assign permissions up to or equal to the permissions they have access to.
-
- Non-Admin Users
- Can have unique permissions within an individual event to focus on one or multiple areas.
- EX: Items, Ticket Page, Landing Page, Finance/Merchant Account Setup
- Can have unique permissions within an individual event to focus on one or multiple areas.
💡When assigning permissions to a non-admin user, use the permission group checkboxes to select all permissions within a category at once, or check individual items for less access.
🛑 How to Remove a User
- Go to Organization > Users or in the event go to Software Settings > Users
- Select the user you want to remove from the dropdown.
- Click the Remove User button.
- A confirmation dialog will appear. Select which events you also want to remove their access from, if applicable.
- Click Remove User to confirm.

🚨 Removing a user is permanent for that organization or event. If you want them to have access again in the future, you will need to add them from scratch. Their user profile will still exist in the system, but their permissions and access will be gone.
📧 How Users Log In for the First Time
- After being created, the user receives an email invitation to set their password.
- Once a password is created, they can log in at cbo.io/admin
🔒 Two-Factor Authentication
ClickBid requires two-factor authentication (2FA) at login to keep your account secure.
Login codes are sent by email by default. Users can also opt to receive codes by text message once they have a phone number on file in their profile.
You will be prompted to enter a 2FA code when:
- Logging in from a new device or browser.
- You have recently cleared your browser cookies.
- It has been more than 14 days since your last login on that device.
ℹ️ To enable text message login codes, add a phone number to your user profile. Once a phone number is on file, you will have the option to receive your code by email or text at each login.
👤 How to Update Your User Profile
- Log in to your ClickBid account.
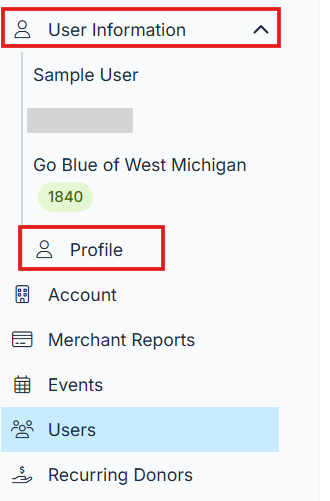
- In the left-hand navigation, click User Information.
- Click Profile.
- Add or update your Phone Number, Email, or Password.
- Click Save.
📝 Summary
Managing users in ClickBid is straightforward from either the Organization or Event level. Use Organization Admin for full access, Event Admin for event-specific full access, and custom permissions for team members who only need access to certain areas. Keep your user list current and remove access promptly when team members change to keep your account secure.