---
title: ➕ Setting Up a Paddle Raise Item/Donation Appeal Display
description: Learn how to set up a Fund-A-Need item in ClickBid, including donation levels, appeal display settings, and how to share the live display during your paddle raise.
---
[Skip to content](https://support.cbo.io/-setting-up-a-paddle-raise-item/donation-appeal-display#main-content)

- [Blog](https://blog.cbo.io/)
- [ClickBid Admin](https://cbo.io/admin/login.php)
Open main navigation
Close main navigation
- [Blog](https://blog.cbo.io/)
- [ClickBid Admin](https://cbo.io/admin/login.php)
- [View our Training Videos](https://training.clickbidonline.com/all-courses/)
[View our Training Videos](https://training.clickbidonline.com/all-courses/)
Welcome to ClickBid's Knowledge Base
- There are no suggestions because the search field is empty.
1. [ClickBid How To Articles](https://support.cbo.io/?hsLang=en)
2. [Peer to Peer and Donation Campaigns](https://support.cbo.io/peer-to-peer-and-donation-campaigns?hsLang=en)
3. [Appeal Display](https://support.cbo.io/peer-to-peer-and-donation-campaigns?hsLang=en#appeal-display)
# ➕ Setting Up a Paddle Raise Item/Donation Appeal Display
A **Fund-A-Need**, also called a **paddle raise** or **direct ask**, is one of the most powerful moments in a live fundraising event. Setting it up in ClickBid gives you a real-time giving display, donor recognition, and customizable visuals to keep your audience engaged and inspired.
---
#### **🛠️ Step 1: Create the Fund-A-Need Item**
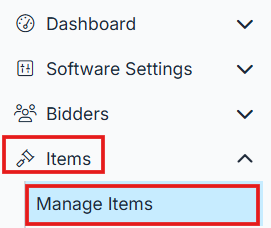
1. In the left-hand navigation, click **Items** to expand the menu.
2. Click **Manage Items**.
3. Click **Add Item** at the top of the All Items table. 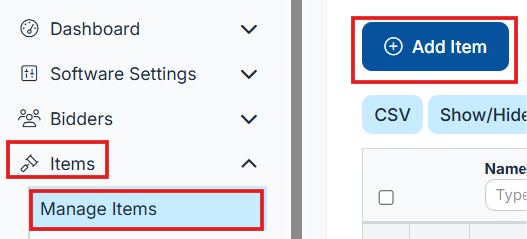
4. In the item edit form that opens, enter an **Item Name** for your appeal (for example, "Fund-A-Need" or "Paddle Raise").
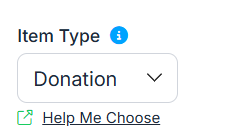
5. Under **Item Type**, select **Donation**.
6. Changes save automatically as you go.
ℹ️ The Donation item type unlocks special settings for Fund-A-Need appeals, including pre-set giving denominations, projected display customization, and donor name recognition on screen.
#### 💵 Step 2: Set Up Your Giving Levels
Pre-set denominations are the giving levels your auctioneer will call out during the appeal. Setting these up creates tap-to-give buttons that make it fast and easy for donors to participate.
1. Within the item edit form, scroll down to the **Item Type** located under Essentials section.
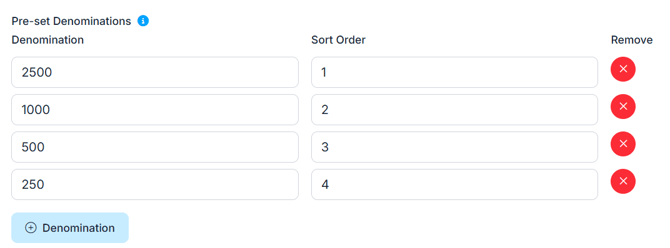
2. Locate the **Pre-set Denominations** area.
3. Click **Denomination** to add a giving level.
4. Enter the dollar amount and a sort order number to control the display sequence.
5. Repeat for each giving level you want to offer.
6. Enter levels in descending order (for example, $5,000, $2,500, $1,000, $500, $250, $100) to match the flow of a live appeal.
💡 Think through your giving levels before your event and align them with what your auctioneer plans to call out. A clean set of 5 to 7 denominations keeps the donor experience smooth and fast.
---
#### 🎥 Step 3: Customize the Projected Display
The Projected Display is what your A/V team puts on screen during the paddle raise. You can customize it to match your event energy and show donors exactly how their impact is growing in real time.
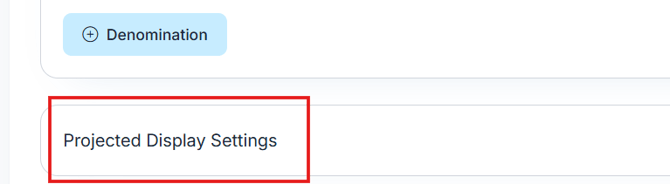
1. Within the item edit form, click **Projected Display Settings** to expand that section.
2. Choose the settings that make sense for your event:
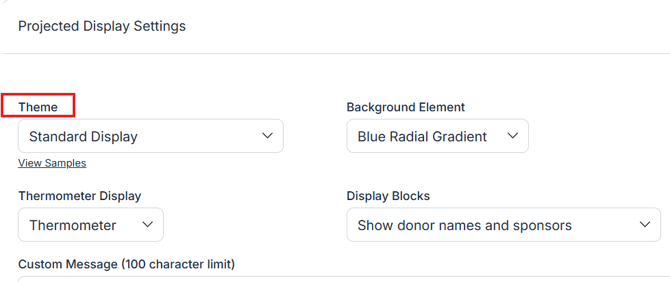
- **Animation Theme**: choose a visual style for the display. Options include Standard Display, Moving Hearts, Building Hearts, School Books, and others. Select **View Samples** to preview each one before deciding.
- **Thermometer Display**: optionally add a progress bar or thermometer visual to show how close you are to your goal.
- **Display Blocks**: choose what content appears on screen: donor names, a custom message, sponsors, or a combination.
- **Donation Goal**: enter your fundraising target to show progress on screen.
- **Donation Buffer**: enter any offline or pre-event donations (cash, check, etc.) so they factor into the progress display.
- **Show QR Code**: display a QR code on screen so guests can give directly from their phones.
- **Show Donor Names:** celebrate each gift as it comes in by displaying donor names on screen.
- **Show Sponsors**: display sponsor logos during the appeal for added visibility.
- **Background**: choose a background color or image to set the visual tone.
- **Custom Message**: add a short message (up to 100 characters) to display on screen.
💡 Test your display settings before the event. Open the appeal share link (see Step 4) on a second screen or monitor so you can see exactly what your audience will see.
---
#### 🔗 Step 4: Share or Launch the Appeal Display
Once your display is all set up, you can send it to your A/V team or open it yourself on a secondary screen.
1. Within the **Projected Display Settings** section, locate the **Appeal Display Share Link**.
2. Copy the link and open it in a new browser tab, or send it to your A/V team to display on the event screen.

ℹ️ If the share link does not appear right away, refresh your browser after saving the item. It should populate once the donation item has been created and saved.
🚨 Have your appeal display open, tested, and ready before your paddle raise begins. It is your live visual scoreboard, you want it running and visible before your auctioneer starts the ask.
#### 📂 Step 5: View and Manage Donations
During and after the appeal, you can track all donations submitted through the Fund-A-Need item.
1. In the left-hand navigation, click **Items** to expand the menu.
2. Click **Manage Items**.
3. Locate your Fund-A-Need item in the All Items table and click the edit icon to open it.
4. Donation activity for this item can be viewed through your standard item reports, including **Event Overview**, **Event Sales,** and **Post Event Data** under the Reports section.
💡If you want to include offline donations, gifts collected by cash, check, or phone, you can enter them manually through Butler during the event. Use the Donation Buffer field in Projected Display Settings to reflect any pre-event or offline totals in the live display. For more information view: [How to Add Offline Donations](https://support.cbo.io/anonymous-offline-donations?hsLang=en)
#### 📝 Summary
Setting up a Fund-A-Need in ClickBid takes just a few steps: create a Donation item, add your giving levels, customize the projected display, and share the link with your A/V team. The real-time display keeps energy high during the ask and gives donors instant recognition for their generosity.
- [Account & Setup](https://support.cbo.io/account-setup?hsLang=en#main-content)
- [Users & Logging In](https://support.cbo.io/account-setup?hsLang=en#users-logging-in)
- [Billing/Renewal](https://support.cbo.io/account-setup?hsLang=en#billing-renewal)
- [Organization Account](https://support.cbo.io/account-setup?hsLang=en#organization-account)
- [Event Settings](https://support.cbo.io/account-setup?hsLang=en#event-settings)
- [Auction Settings](https://support.cbo.io/account-setup?hsLang=en#auction-settings)
- [Welcome Page](https://support.cbo.io/account-setup?hsLang=en#welcome-page)
- [Get Started](https://support.cbo.io/get-started?hsLang=en#main-content)
- [Pre-Event Prep](https://support.cbo.io/get-started?hsLang=en#pre-event-prep)
- [Creating a New Event](https://support.cbo.io/get-started?hsLang=en#creating-a-new-event)
- [Event Day Toolkit](https://support.cbo.io/event-day-toolkit?hsLang=en#main-content)
- [Paddle Raise](https://support.cbo.io/event-day-toolkit?hsLang=en#paddle-raise)
- [Live Auction](https://support.cbo.io/event-day-toolkit?hsLang=en#live-auction)
- [Silent Auction](https://support.cbo.io/event-day-toolkit?hsLang=en#silent-auction)
- [Butler](https://support.cbo.io/event-day-toolkit?hsLang=en#butler)
- [Volunteer Training](https://support.cbo.io/event-day-toolkit?hsLang=en#volunteer-training)
- [Messaging](https://support.cbo.io/messaging?hsLang=en#main-content)
- [Text & Emails](https://support.cbo.io/messaging?hsLang=en#text-emails)
- [Chat Bidders](https://support.cbo.io/messaging?hsLang=en#chat-bidders)
- [Welcome Text, Text Bidders, & Email Bidders](https://support.cbo.io/messaging?hsLang=en#welcome-text-text-bidders-email-bidders)
- [Tickets & Sponsorships](https://support.cbo.io/tickets-sponsorships?hsLang=en#main-content)
- [Tickets, Sponsorships & Underwriting Overview](https://support.cbo.io/tickets-sponsorships?hsLang=en#tickets-sponsorships-underwriting-overview)
- [Reporting & Data](https://support.cbo.io/tickets-sponsorships?hsLang=en#reporting-data)
- [Manage Ticketed Guests](https://support.cbo.io/tickets-sponsorships?hsLang=en#manage-ticketed-guests)
- [RSVP & Invoicing](https://support.cbo.io/tickets-sponsorships?hsLang=en#rsvp-invoicing)
- [Items](https://support.cbo.io/items?hsLang=en#main-content)
- [Items Overview & Setup](https://support.cbo.io/items?hsLang=en#items-overview-setup)
- [Quantity Items / E-Commerce](https://support.cbo.io/items?hsLang=en#quantity-items-e-commerce)
- [Item Donation Form and Donors](https://support.cbo.io/items?hsLang=en#item-donation-form-and-donors)
- [FMV & Tax](https://support.cbo.io/items?hsLang=en#fmv-tax)
- [Peer to Peer and Donation Campaigns](https://support.cbo.io/peer-to-peer-and-donation-campaigns?hsLang=en#main-content)
- [Peer to Peer and Donation Setup](https://support.cbo.io/peer-to-peer-and-donation-campaigns?hsLang=en#peer-to-peer-and-donation-setup)
- [Recurring Donations](https://support.cbo.io/peer-to-peer-and-donation-campaigns?hsLang=en#recurring-donations)
- [Text to Give](https://support.cbo.io/peer-to-peer-and-donation-campaigns?hsLang=en#text-to-give)
- [Embed Your Donation Form](https://support.cbo.io/peer-to-peer-and-donation-campaigns?hsLang=en#embed-your-donation-form)
- [Appeal Display](https://support.cbo.io/peer-to-peer-and-donation-campaigns?hsLang=en#appeal-display)
- [Bidders](https://support.cbo.io/bidders?hsLang=en#main-content)
- [Bidder Setup](https://support.cbo.io/bidders?hsLang=en#bidder-setup)
- [Donor Thank You Letters](https://support.cbo.io/bidders?hsLang=en#donor-thank-you-letters)
- [Bidder Registration Custom Questions](https://support.cbo.io/bidders?hsLang=en#bidder-registration-custom-questions)
- [Reporting & Data](https://support.cbo.io/reporting-data?hsLang=en#main-content)
- [Event Reporting](https://support.cbo.io/reporting-data?hsLang=en#event-reporting)
- [Credit Card Processing & Payments](https://support.cbo.io/credit-card-processing-payments?hsLang=en#main-content)
- [Credit Card Processing & Payments](https://support.cbo.io/credit-card-processing-payments?hsLang=en#credit-card-processing-payments)
- [FAQs](https://support.cbo.io/credit-card-processing-payments?hsLang=en#faqs)
- [Merchant Account & Merchant Report](https://support.cbo.io/credit-card-processing-payments?hsLang=en#merchant-account-merchant-report)
- [Web Content / Event Landing Pages](https://support.cbo.io/web-content-event-landing-pages?hsLang=en#main-content)
- [Design & Customization](https://support.cbo.io/web-content-event-landing-pages?hsLang=en#design-customization)
- [Accepting Donations From Your Landing Page](https://support.cbo.io/web-content-event-landing-pages?hsLang=en#accepting-donations-from-your-landing-page)
- [EventStream Video Streaming](https://support.cbo.io/eventstream-video-streaming?hsLang=en#main-content)
- [Virtual Live Auction and Paddle Raise](https://support.cbo.io/eventstream-video-streaming?hsLang=en#virtual-live-auction-and-paddle-raise)
- [EventStream FAQ](https://support.cbo.io/eventstream-video-streaming?hsLang=en#eventstream-faq)
- [Integrations + Partners](https://support.cbo.io/integrations-partners?hsLang=en#main-content)
- [Neon One](https://support.cbo.io/integrations-partners?hsLang=en#neon-one)
- [Raiser's Edge NXT](https://support.cbo.io/integrations-partners?hsLang=en#raisers-edge-nxt)
- [Bloomerang](https://support.cbo.io/integrations-partners?hsLang=en#bloomerang)
- [Salesforce for Nonprofits](https://support.cbo.io/integrations-partners?hsLang=en#salesforce-for-nonprofits)
- [Charityproud](https://support.cbo.io/integrations-partners?hsLang=en#charityproud)
- [Classy](https://support.cbo.io/integrations-partners?hsLang=en#classy)
- [TravelPledge](https://support.cbo.io/integrations-partners?hsLang=en#travelpledge)
- [Double the Donation](https://support.cbo.io/integrations-partners?hsLang=en#double-the-donation)
- [HGA Fundraising](https://support.cbo.io/integrations-partners?hsLang=en#hga-fundraising)
- [Public API](https://support.cbo.io/integrations-partners?hsLang=en#public-api)
- [Zapier](https://support.cbo.io/integrations-partners?hsLang=en#zapier)
- [Virtuous](https://support.cbo.io/integrations-partners?hsLang=en#virtuous)
- [Charity Experiences](https://support.cbo.io/integrations-partners?hsLang=en#charity-experiences)
- [Donorperfect](https://support.cbo.io/integrations-partners?hsLang=en#donorperfect)
- [Little Green Light](https://support.cbo.io/integrations-partners?hsLang=en#little-green-light)
- [FAQs](https://support.cbo.io/faqs?hsLang=en#main-content)
- [FAQs](https://support.cbo.io/faqs?hsLang=en#faqs)
[](https://try.cbo.io)
ClickBid Training Hub
Copyright © 2026, ClickBid Event Fundraising
```json
{
"@context" : "https://schema.org",
"@type" : "VideoObject",
"caption" : {
"@type" : "MediaObject",
"contentUrl" : "https://support.cbo.io/media-transcripts/215570993949/en.vtt",
"inLanguage" : "en",
"name" : "en Captions"
},
"contentUrl" : "https://22025730.fs1.hubspotusercontent-na1.net/hubfs/22025730/video_assets/215570993949/inherited/web_optimized.mp4",
"dateModified" : "2026-06-22T14:42:35.076Z",
"duration" : "PT5M6S",
"height" : 1080,
"name" : "Setting up a paddle raise and appeal settings",
"thumbnailUrl" : "https://22025730.fs1.hubspotusercontent-na1.net/hubfs/22025730/Setting%20up%20a%20paddle%20raise%20and%20appeal%20settings.mp4/medium.jpg",
"uploadDate" : "2026-06-22T14:42:01.185Z",
"width" : 1920
}
```