---
title: 📋 How to Collect Required Bidder Information Before Your Event
description: Learn how to collect required bidder information before your event in ClickBid. Enable early access, prevent duplicate records, and streamline check-in with these simple setup steps.
---
[Skip to content](https://support.cbo.io/-collecting-required-bidder-info-before-your-event#main-content)

- [Blog](https://blog.cbo.io/)
- [ClickBid Admin](https://cbo.io/admin/login.php)
Open main navigation
Close main navigation
- [Blog](https://blog.cbo.io/)
- [ClickBid Admin](https://cbo.io/admin/login.php)
- [View our Training Videos](https://training.clickbidonline.com/all-courses/)
[View our Training Videos](https://training.clickbidonline.com/all-courses/)
Welcome to ClickBid's Knowledge Base
- There are no suggestions because the search field is empty.
1. [ClickBid How To Articles](https://support.cbo.io/?hsLang=en)
2. [FAQs](https://support.cbo.io/faqs?hsLang=en)
3. [FAQs](https://support.cbo.io/faqs?hsLang=en#faqs)
# 📋 How to Collect Required Bidder Information Before Your Event
## Getting bidders into your auction site before the event means faster check-in, smoother checkout, and less scrambling at the door. Depending on your event setup, there are three ways to approach this. Choose the option that fits your situation.
Want to make event check-in easier? Collecting required information *before* your event is the way to go. By giving bidders early access to your auction site, you can gather their contact details and speed things up onsite.
---
### ⚙️ Before You Start: Enable Early Access
Before you open early access, make sure your auction items are in the right state.
This setting is required for all three options below.
1. Go to **Software Settings \> Landing Page Builder**.
2. Click **Page Settings**.
3. Set **Open Auction Early** to **Yes**.
4. Click **Save**.
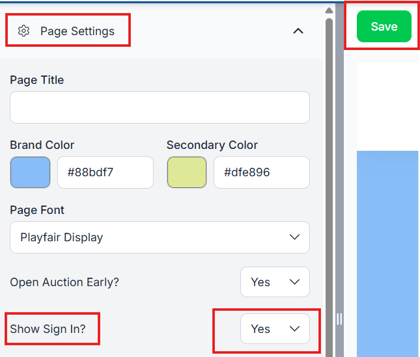
This allows bidders to access your site and complete their information before your auction goes live.
---
#### 🛍️ Option A: Preview Auction Items and Collect Credit Cards
Best for events where you want to give bidders a sneak peek at items and encourage them to add a card before the event.
**Set up your items:**
1. Go to **Items \> Manage Items**.
2. Check the boxes next to items you are not ready to open for bidding yet.
3. Scroll down to **Batch Update**.
4. Check the box next to **Status** and select **Closed** (visible but not open for bidding) or **Invisible** (hides items completely).
5. Click **Update**.
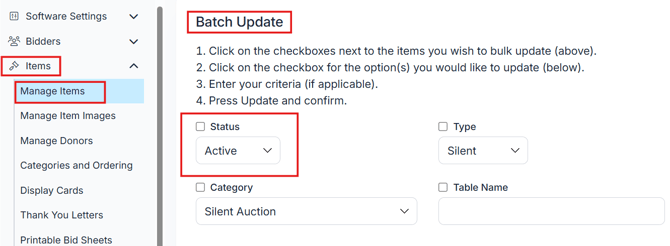
💡 Make sure at least one item is set to **Active (can place bids/donate)** or **Closed (can view items but not place bids yet)** so bidders don't land on a blank page. A simple donation item works great as a placeholder until your full auction opens.
**Allow new bidders to register:**
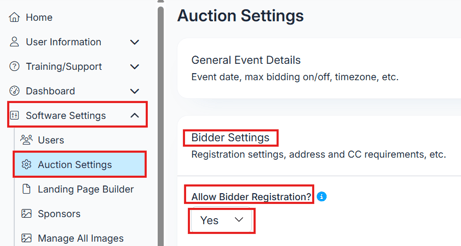
1. Go to **Software Settings \> Auction Settings \> Bidder Settings**.
2. Set **Allow Bidder Registration** to **Yes**.
**Require Credit Cards for faster checkout**
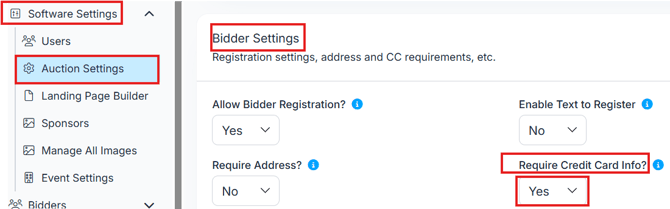
1. Go to **Software Settings\>Auction Settings\>Bidder Settings**
2. Set **Require Credit Card** to **Yes
**
💡 If **Require Credit Card** is set to **No** in Auction Settings \> Bidder Settings, bidders can still add their card voluntarily by going to **My Account** once they are logged in. Use your pre-event Mass Message to encourage them to do this before the event.
**Show the Sign In on your landing page:**
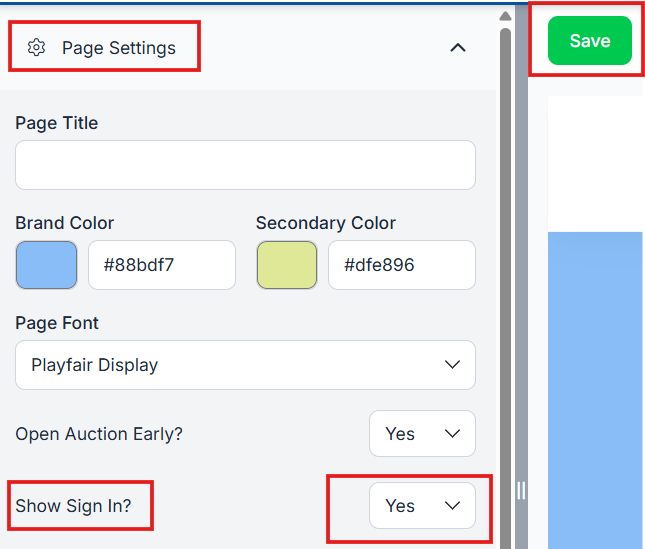
1. Go to **Software Settings \> Landing Page Builder \> Page Settings**.
2. Set **Show Sign In** to **Yes**.
3. click **Save**
---
#### 📝 Option B: No Auction Items, Allow Bidders to Register and Add Information
Best for events where your auction is not ready yet but you want to let bidders create an account and fill in their information early.
🚨If you are selling tickets do not use this option. When you turn guests into bidders they will already be registers. Allowing Bidder Registration along with selling tickets creates confusion and duplicate bidders.
**Turn off auction display elements:**
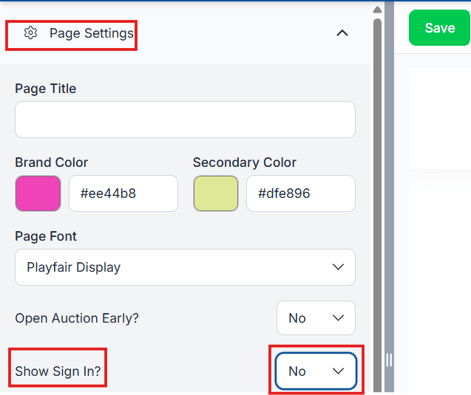
1. Go to **Software Settings \> Landing Page Builder \> Page Settings**.
2. Set **Show Sign In** to **No**.
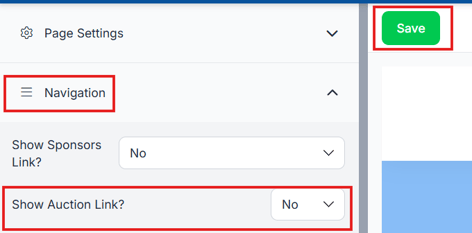
3. While on the **Landing page builder** go to **Navigation**
4. Set **Show Auction Link** to **No**.
1. Once Auction Link is set to no, the **Auction Title** is hidden from the Navigation bar and menu.
5. Click **Save**.
**Allow new bidders to register:**
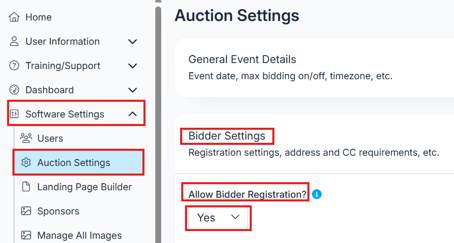
1. Go to **Software Settings \> Auction Settings \> Bidder Settings**.
2. Set **Allow Bidder Registration** to **Yes**.
**Require Credit Cards for faster checkout**
1. Go to **Software Settings\>Auction Settings\>Bidder Settings**
2. Set **Require Credit Card** to **Yes
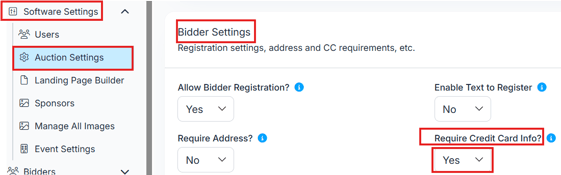**
3. Once the auction opens and they go to log in they will have to add their credit card.
💡 If **Require Credit Card** is set to **No** in Auction Settings \> Bidder Settings, bidders can still add their card voluntarily by going to **My Account** once they are logged in. Use your pre-event Mass Message to encourage them to do this before the event.
---
#### 🔒 Option C: No Auction Items, Existing Bidders Only (No New Registrations)
Best for events where your bidder list is already set and you simply want existing bidders to log in, confirm their details, and add a credit card before the night of the event. New guests will not be able to create an account.
**Turn off auction display elements:**
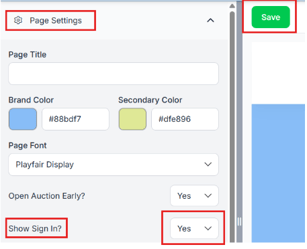
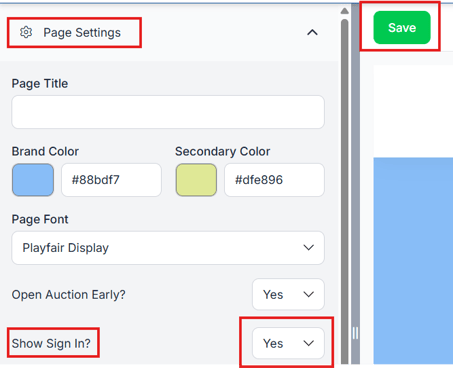
1. Go to **Software Settings \> Landing Page Builder \>Page Settings**
2. Set **Show Sign In** to **Yes
**
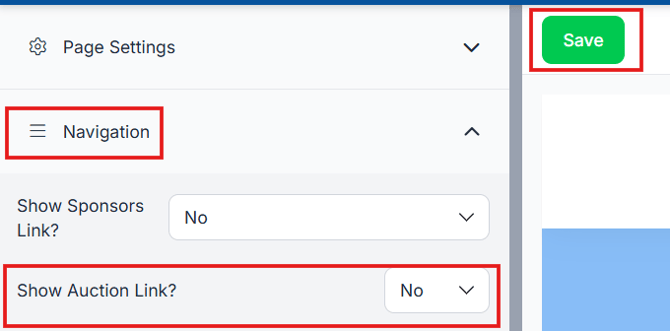
3. While on the **Landing Page Builder** go to **Navigation**.
4. Set **Show Auction Link** to **No**.
1. The **Auction Title** is hidden from displaying as a link on the landing page.
5. Click **Save**.
**Disable new bidder registration:**
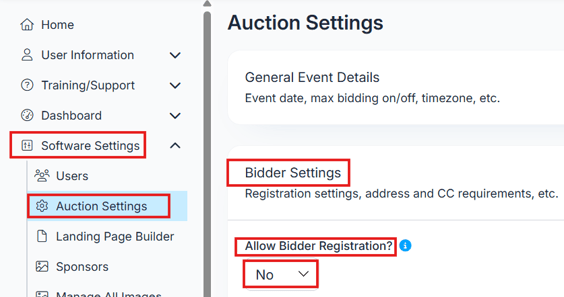
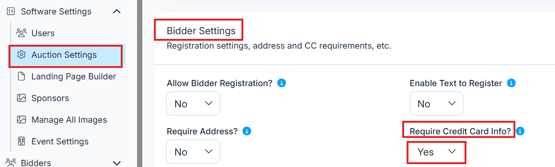
1. Go to **Software Settings \> Auction Settings \> Bidder Settings**.
2. Set **Allow Bidder Registration** to **No**.
1. This removes the Sign Up option so only existing bidders in your Manage Bidders list can log in.
**Require a credit card:**
1. Stay in **Software Settings \> Auction Settings \> Bidder Settings**.
2. Set **Require Credit Card** to **Yes**
💡 If **Require Credit Card** is set to **No** in Auction Settings \> Bidder Settings, bidders can still add their card voluntarily by going to **My Account** once they are logged in. Use your pre-event Mass Message to encourage them to do this before the event.
****
---
#### 📲 Step: Invite Bidders to Log In via Mass Messaging
For all three options, use Mass Messaging to send bidders a direct link so they know to log in and complete their information.
1. Go to **Bidders \> Text Bidders** or **Email Bidders** (or both).
2. Compose your message using the **\[u\]** shortcode to include each bidder's unique personalized link.
3. Send the message 24 to 48 hours before the event.
⚠️ Make sure you have at least one contact method (email or phone) on file for each bidder before sending. ClickBid checks for duplicate records using email or phone, not names. Uploading incomplete bidder info can lead to duplicates.
---
#### 💬 Sample Text Messages
All are under 160 characters including shortcodes. You will just want to double check because if you have long first names the \[f\] could take up a few extra characters.
**General pre-event login:**
- "Hi \[f\]! Get a head start before the event. Log in and review your info: \[u\]"
- Hi! Get a head start before the event. Log in & review your info under My Account section: \[u\]
**To encourage adding a credit card:**
- "Hi! Save time at checkout, add your card before the event under My Account Section. Log in here: \[u\]"
**Skip the line:**
- "Hi \[f\]! Skip the line, log in and add your credit card under My Account section before the event \[u\]"
**For VIP guests** (choose your favorite or write your own)**:**
- "Hi \[f\], make your evening seamless, add your credit card under My Account section ahead of time: \[u\]"
- "Hi \[f\], as a valued guest, add your credit card under My Account section for a seamless evening: \[u\]"
- "Hi \[f\], save your credit card under My Account section before the event for a seamless experience: \[u\]"
- Hi \[f\], save your credit card under My Account section before the event for a seamless check in: \[u\]
---
### 👥 What Bidders See for Option A
Here’s what happens when a bidder receives your message and clicks the link:
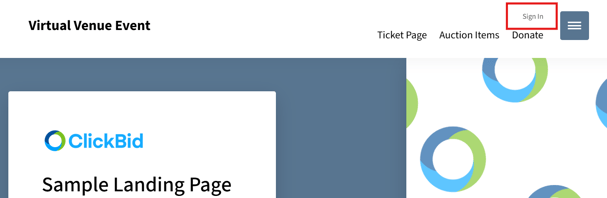
1. They go to your **Landing Page** and click **Sign In.**
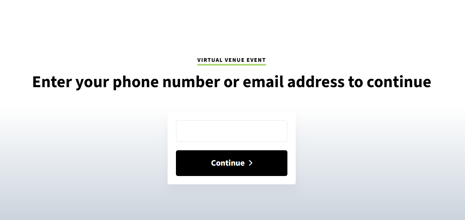
2. They'll enter their **email or phone number**.
3. They receive a **login code** via text or email and enter it into the field.
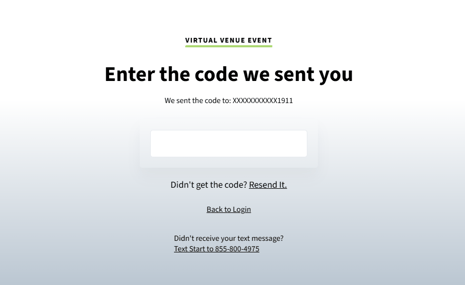
4. They are then prompted to provide any **required fields** (like credit card or address, depending on your settings).
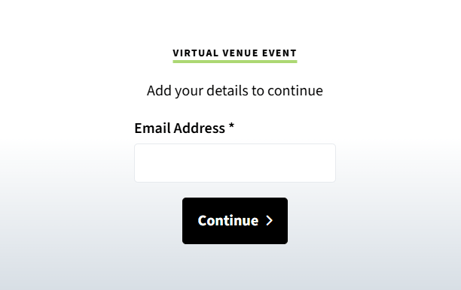
- You can customize which fields are required under **Software Settings \> Auction Settings \> Bidder Settings**.
5. Once done, they are redirected to the **landing page**, where any active items (like your donation placeholder) will be visible.
💡 Once a bidder completes this process once, future logins only require their email or phone number and a login code. No need to re-enter information.
---
### 👥 What Bidders See for Option B
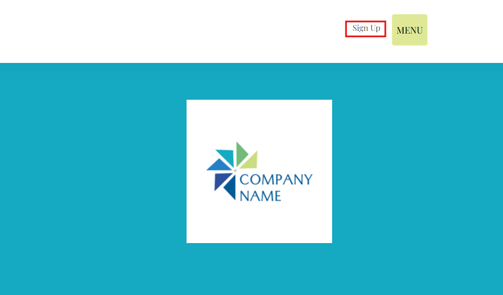
1. They go to your **Landing Page** and click **Sign Up.
**
2. They'll enter their email or phone number.
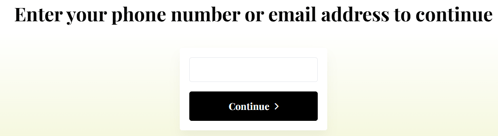
3. They will enter mobile phone, email, First/Last name, (these are required fields) address
1. Address can be required under Software Settings\>Auction Settings\>Bidder Settings\>Require Address. If this field is set to Yes they will be required to add their email before they can continue. 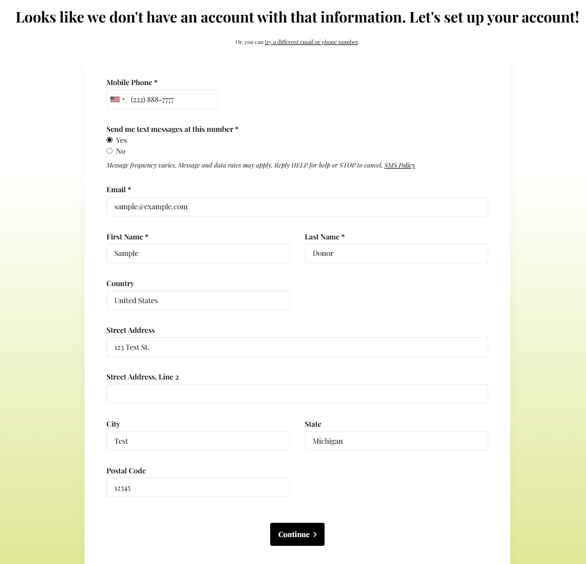
4. After clicking Continue they get the following message.

1. You can customize that message by going to Software Settings\>Auction Settings\>Bidder Settings\> Registration Message 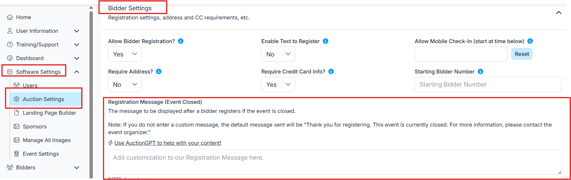
### 👥 What Bidders See for Option C
1. If you send them to your event landing page they will click 'Sign in' from the menu if they are using a mobile device
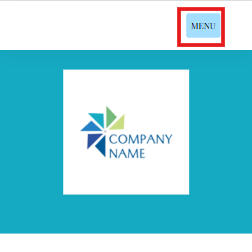
1. After clicking Menu they will click Sign in
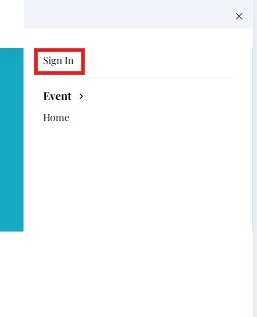
Desktop:
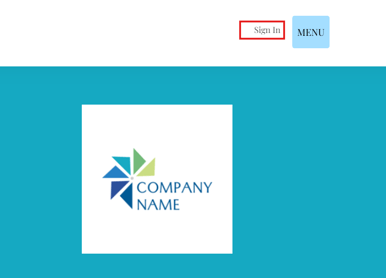
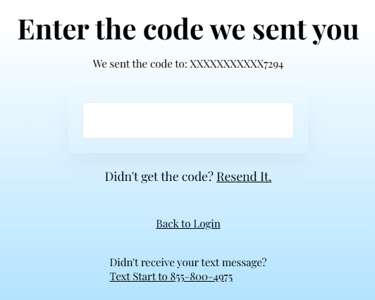
2. if you send them a welcome text or mass message using the \[u\] link they will click on the link and go directly to the one time login code screen.
3. They will receive the login code and enter it in the field displayed:
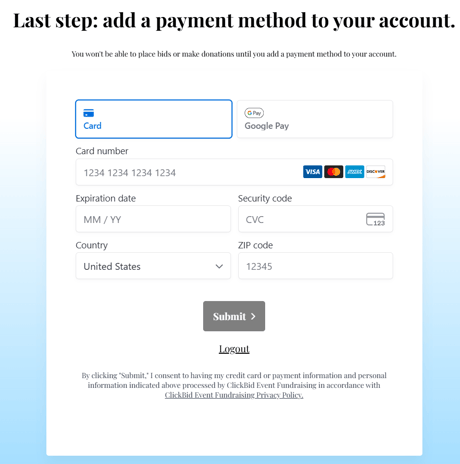
4. Upon entering the code if Require Credit Card is set to yes they will be required to add one
#### ✅ Pre-Event Checklist
- **Open Auction Early** is set to **Yes** in Landing Page Builder \> Page Settings
- **Show Sign In** is set to **Yes** in Landing Page Builder \> Page Settings
- **Allow Bidder Registration** is set correctly for your option (Yes for A and B, No for C)
- **Auction Link** and **Auction Title** are hidden for Options B and C
- Required fields are configured in **Auction Settings \> Bidder Settings**
- Mass message sent with \[u\] shortcode 24 to 48 hours **before** the event
- Follow-up reminder sent the morning of the event
- [Account & Setup](https://support.cbo.io/account-setup?hsLang=en#main-content)
- [Users & Logging In](https://support.cbo.io/account-setup?hsLang=en#users-logging-in)
- [Billing/Renewal](https://support.cbo.io/account-setup?hsLang=en#billing-renewal)
- [Organization Account](https://support.cbo.io/account-setup?hsLang=en#organization-account)
- [Event Settings](https://support.cbo.io/account-setup?hsLang=en#event-settings)
- [Auction Settings](https://support.cbo.io/account-setup?hsLang=en#auction-settings)
- [Welcome Page](https://support.cbo.io/account-setup?hsLang=en#welcome-page)
- [Get Started](https://support.cbo.io/get-started?hsLang=en#main-content)
- [Pre-Event Prep](https://support.cbo.io/get-started?hsLang=en#pre-event-prep)
- [Creating a New Event](https://support.cbo.io/get-started?hsLang=en#creating-a-new-event)
- [Event Day Toolkit](https://support.cbo.io/event-day-toolkit?hsLang=en#main-content)
- [Paddle Raise](https://support.cbo.io/event-day-toolkit?hsLang=en#paddle-raise)
- [Live Auction](https://support.cbo.io/event-day-toolkit?hsLang=en#live-auction)
- [Silent Auction](https://support.cbo.io/event-day-toolkit?hsLang=en#silent-auction)
- [Butler](https://support.cbo.io/event-day-toolkit?hsLang=en#butler)
- [Volunteer Training](https://support.cbo.io/event-day-toolkit?hsLang=en#volunteer-training)
- [Messaging](https://support.cbo.io/messaging?hsLang=en#main-content)
- [Text & Emails](https://support.cbo.io/messaging?hsLang=en#text-emails)
- [Chat Bidders](https://support.cbo.io/messaging?hsLang=en#chat-bidders)
- [Welcome Text, Text Bidders, & Email Bidders](https://support.cbo.io/messaging?hsLang=en#welcome-text-text-bidders-email-bidders)
- [Tickets & Sponsorships](https://support.cbo.io/tickets-sponsorships?hsLang=en#main-content)
- [Tickets, Sponsorships & Underwriting Overview](https://support.cbo.io/tickets-sponsorships?hsLang=en#tickets-sponsorships-underwriting-overview)
- [Reporting & Data](https://support.cbo.io/tickets-sponsorships?hsLang=en#reporting-data)
- [Manage Ticketed Guests](https://support.cbo.io/tickets-sponsorships?hsLang=en#manage-ticketed-guests)
- [RSVP & Invoicing](https://support.cbo.io/tickets-sponsorships?hsLang=en#rsvp-invoicing)
- [Items](https://support.cbo.io/items?hsLang=en#main-content)
- [Items Overview & Setup](https://support.cbo.io/items?hsLang=en#items-overview-setup)
- [Quantity Items / E-Commerce](https://support.cbo.io/items?hsLang=en#quantity-items-e-commerce)
- [Item Donation Form and Donors](https://support.cbo.io/items?hsLang=en#item-donation-form-and-donors)
- [FMV & Tax](https://support.cbo.io/items?hsLang=en#fmv-tax)
- [Peer to Peer and Donation Campaigns](https://support.cbo.io/peer-to-peer-and-donation-campaigns?hsLang=en#main-content)
- [Peer to Peer and Donation Setup](https://support.cbo.io/peer-to-peer-and-donation-campaigns?hsLang=en#peer-to-peer-and-donation-setup)
- [Recurring Donations](https://support.cbo.io/peer-to-peer-and-donation-campaigns?hsLang=en#recurring-donations)
- [Text to Give](https://support.cbo.io/peer-to-peer-and-donation-campaigns?hsLang=en#text-to-give)
- [Embed Your Donation Form](https://support.cbo.io/peer-to-peer-and-donation-campaigns?hsLang=en#embed-your-donation-form)
- [Appeal Display](https://support.cbo.io/peer-to-peer-and-donation-campaigns?hsLang=en#appeal-display)
- [Bidders](https://support.cbo.io/bidders?hsLang=en#main-content)
- [Bidder Setup](https://support.cbo.io/bidders?hsLang=en#bidder-setup)
- [Donor Thank You Letters](https://support.cbo.io/bidders?hsLang=en#donor-thank-you-letters)
- [Bidder Registration Custom Questions](https://support.cbo.io/bidders?hsLang=en#bidder-registration-custom-questions)
- [Reporting & Data](https://support.cbo.io/reporting-data?hsLang=en#main-content)
- [Event Reporting](https://support.cbo.io/reporting-data?hsLang=en#event-reporting)
- [Credit Card Processing & Payments](https://support.cbo.io/credit-card-processing-payments?hsLang=en#main-content)
- [Credit Card Processing & Payments](https://support.cbo.io/credit-card-processing-payments?hsLang=en#credit-card-processing-payments)
- [FAQs](https://support.cbo.io/credit-card-processing-payments?hsLang=en#faqs)
- [Merchant Account & Merchant Report](https://support.cbo.io/credit-card-processing-payments?hsLang=en#merchant-account-merchant-report)
- [Web Content / Event Landing Pages](https://support.cbo.io/web-content-event-landing-pages?hsLang=en#main-content)
- [Design & Customization](https://support.cbo.io/web-content-event-landing-pages?hsLang=en#design-customization)
- [Accepting Donations From Your Landing Page](https://support.cbo.io/web-content-event-landing-pages?hsLang=en#accepting-donations-from-your-landing-page)
- [EventStream Video Streaming](https://support.cbo.io/eventstream-video-streaming?hsLang=en#main-content)
- [Virtual Live Auction and Paddle Raise](https://support.cbo.io/eventstream-video-streaming?hsLang=en#virtual-live-auction-and-paddle-raise)
- [EventStream FAQ](https://support.cbo.io/eventstream-video-streaming?hsLang=en#eventstream-faq)
- [Integrations + Partners](https://support.cbo.io/integrations-partners?hsLang=en#main-content)
- [Neon One](https://support.cbo.io/integrations-partners?hsLang=en#neon-one)
- [Raiser's Edge NXT](https://support.cbo.io/integrations-partners?hsLang=en#raisers-edge-nxt)
- [Bloomerang](https://support.cbo.io/integrations-partners?hsLang=en#bloomerang)
- [Salesforce for Nonprofits](https://support.cbo.io/integrations-partners?hsLang=en#salesforce-for-nonprofits)
- [Charityproud](https://support.cbo.io/integrations-partners?hsLang=en#charityproud)
- [Classy](https://support.cbo.io/integrations-partners?hsLang=en#classy)
- [TravelPledge](https://support.cbo.io/integrations-partners?hsLang=en#travelpledge)
- [Double the Donation](https://support.cbo.io/integrations-partners?hsLang=en#double-the-donation)
- [HGA Fundraising](https://support.cbo.io/integrations-partners?hsLang=en#hga-fundraising)
- [Public API](https://support.cbo.io/integrations-partners?hsLang=en#public-api)
- [Zapier](https://support.cbo.io/integrations-partners?hsLang=en#zapier)
- [Virtuous](https://support.cbo.io/integrations-partners?hsLang=en#virtuous)
- [Charity Experiences](https://support.cbo.io/integrations-partners?hsLang=en#charity-experiences)
- [Donorperfect](https://support.cbo.io/integrations-partners?hsLang=en#donorperfect)
- [Little Green Light](https://support.cbo.io/integrations-partners?hsLang=en#little-green-light)
- [FAQs](https://support.cbo.io/faqs?hsLang=en#main-content)
- [FAQs](https://support.cbo.io/faqs?hsLang=en#faqs)
[](https://try.cbo.io)
ClickBid Training Hub
Copyright © 2026, ClickBid Event Fundraising
```json
{
"@context" : "https://schema.org",
"@type" : "VideoObject",
"caption" : {
"@type" : "MediaObject",
"contentUrl" : "https://support.cbo.io/media-transcripts/217898682997/en.vtt",
"inLanguage" : "en",
"name" : "en Captions"
},
"contentUrl" : "https://22025730.fs1.hubspotusercontent-na1.net/hubfs/22025730/video_assets/217898682997/inherited/web_optimized.mp4",
"dateModified" : "2026-07-24T12:53:07.546Z",
"duration" : "PT6M24S",
"height" : 1080,
"name" : "Collecting Bidder Info",
"thumbnailUrl" : "https://22025730.fs1.hubspotusercontent-na1.net/hubfs/22025730/Collecting%20Bidder%20Info.mp4/medium.jpg",
"uploadDate" : "2026-07-24T12:52:27.527Z",
"width" : 1920
}
```